Door Seal Kit Install
Door Seal Kit Install Video Transcript
The Acoustic Geometry Door Seal Kit is a great way to start soundproofing a room
Because it seals the air gaps around a solid core door.
The key is accurately measuring the door frame before cutting the seals. First, measure the hinge side
Door jamb from the threshold to the inside of the upper door stop.
Then repeat with the latch side jamb.
It’s a good idea to write down the measurements.
Carefully measure out the first jamb seal on the aluminum channel. Not on the rubber gasket. Mark a cutting line perpendicular to the channel and set the rubber seal side against the saw back stop. Make sure the saw blade is set for a 90-degree cut
Cut the door seal slowly and carefully. The cut end piece can fly, so wear eye protection.
Carefully measure the second jamb seal and mark the cutting line perpendicular to the aluminum channel. Place the seal with the rubber gasket side against the saw backstop, and again, slowly and carefully cut the seal. Remember, measure twice, cut once, unless you’d like to buy another door seal kit.
Pull the rubber on the non-cut end back into the channel
Place the hinge side door seal with the cut end down against the door stop and check for fit. Make sure the door opens and closes without binding the rubber gasket. Drill the center-mounting hole into door-stop, and carefully screw in the seal. Drill and screw the remaining door seal holes
Then, repeat on the latch side.
Accurately measure the space between the inside jamb seal channels and carefully cut the top door stop seal.
The top seal should fit tightly between the two side seals. Drill the holes and carefully tighten the screws.
Now we can adjust the side and top door seal gaskets.
A sheet of paper shows where we need to tighten the seals. Counter-clockwise turns on the adjusting screws push the gasket toward the door. Continue until all the seals are lightly seated against the door with no binding when open and closed.
Now we measure between the insides of the jamb seals for the automatic bottom seal
Measure and mark the cutting line on the end without the actuator screw.
Gently pull back the rubber gasket on the end without the actuator screw and place the aluminum channel side against the saw backstop. Carefully holding the rubber gasket away from the saw blade. Make sure your hand is well clear of the blade.
Install the actuator screw end toward the hinge side of the door.
With a pair of sharp scissors perpendicular to the aluminum channel, carefully trim the rubber gasket to leave a 1/8th inch reveal beyond the channel end. Then repeat on the other end, keeping the cut straight on both ends.
The bottom seal MUST clear the floor covering. Place appropriate height spacers at the sides to hold the bottom seal level with the door threshold.
Place the bottom seal on the spacers with the actuator screw toward the hinge side, checking the fit.
Starting at the center, drill and screw down the bottom seal, taking care not to overtighten the mounting screws. The automatic gasket will drop or self-level correctly if the mounting screws are too tight.
Adjust the actuator screw so the gasket drops completely to the threshold when the door is closed.
A strong light source will help in checking your adjustments. When properly set, the door seal kit will completely seal the gaps around your door
 What’s First?
 What Is Soundproofing?
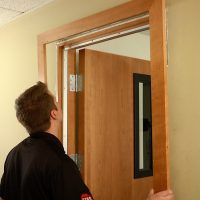 Soundproof Door Install
 Climate Seal Acoustical Window Inserts