How to Install a Door Seal Kit: Soundproofing Doors
How to Seal Doors: Blocking External Noise and Ensuring Privacy
Generally speaking, most of us prefer our private conversations to remain private, but even more importantly, speech privacy and confidentiality is an un-questioned requirement in medical, legal, and business settings – just to name a few.
Whether for personal or professional discretion, discussions behind closed doors should remain behind closed doors. And as much as we might wish to protect the privacy of our conversations, we also want to keep unwanted noise from intruding on and interfering with our hearing while we’re inside those spaces.
Simply put: we want to keep unwanted noise outside the room, and we want to keep our own sound inside and private.
Each and every room or space has its own unique acoustical signature – depending on its layout, dimensions, and the nature of its interior surfaces. For as many different possible room designs, therefore, there are at least as many, if not more, strategies that you could employ in soundproofing and treating them acoustically. A quick and cost-effective place to start is with your doors.
Soundproofing: Sealing Door Frames
 If you’re on a budget, your best bet is to start by door soundproofing. You’d be amazed how much a small gap between a door and its frame can compromise a room’s ability to block sound. According to an article in Forbes, a 1 percent opening in a wall or doorway will reduce the sound blocking effectiveness of that barrier by as much as 50 percent.
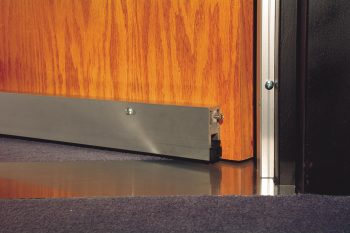
An Acoustic Door Seal Kit is a great way to start soundproofing a room because it seals the air gaps around a solid-core door with a smooth level threshold (the self-leveling bottom seal does not work well with a carpeted threshold). It’s easy to install, highly effective, and very durable.
Installing Your Acoustical Surfaces Door Seal Kit
Equipment you’ll need:
- Measuring tape
- Right angle
- Marking pencil
- Power miter saw with a sharp, carbide-tip saw blade
- Screw driver with standard variety of headsSafety glasses
SAFETY PRECAUTIONS
Ensure that you always wear safety glasses when cutting the door seal pieces because cut ends or particles can fly in the cutting process – so protect your eyes!
Always keep your hands and fingers well clear of the blade when you are cutting the door seal pieces.
1. Measuring the vertical height of the door frame
You need to accurately measure the door frame before cutting the seals. A good rule of thumb is to “measure twice, cut once.” It’s helpful to note these measurements as you progress – whatever works best to ensure that you get the right measurements and don’t accidentally waste materials should you make a mistake once you start cutting.
i. Measure the height of the hinge-side door stop (the part of the frame that the door stops against inside the jamb) from the threshold up to the inside edge of the upper door stop.
ii. Measure the height of the latch-side door stop from the threshold up to the inside edge of the upper door stop.
2. Cutting the vertical door seal pieces
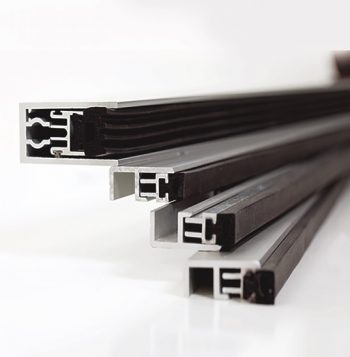
i. Measure the hinge-side door stop seal on the aluminum channel, i.e. not on the rubber gasket.
ii. Mark a perpendicular/90° cutting line on the channel, and set the rubber seal side against the saw back-stop.
iii. With the saw blade set for 90°, carefully cut the piece.
iv. Repeat Steps i-iii for the latch-side door stop piece.
Now that you have cut your two vertical door seal pieces, install them.
3. Installing the vertical door seals
i. First, install the hinge-side, vertical door seal.
ii. Pull any extra rubber on the non-cut end back into the channel so that none is left hanging over the end.
iii. Place the hinge-side door seal, with the cut edge down and the rubber gasket facing the door.Check for fit: ensure the rubber gasket meets the surface of the door when it is closed, but make sure that it doesn’t interfere with the door’s ability to open and close without binding.
iv. Drill and screw the center mounting hole into the door stop first, then drill and screw the remaining holes.
v. Repeat Steps i-iv on the latch-side, vertical door stop.
4. Installing the top/horizontal door seal
i. Accurately measure the width between the vertical door seals at the top of the door, and cut the next piece of door seal to those measurements
(see Section 1., “Cutting the vertical door seal pieces”)
ii. Place the top/horizontal seal piece into position at the top of the door, with the rubber gasket facing the door. It should fit tightly into place within the vertical door seals.
iii. Screw and drill the center screw hole first, then drill and screw the remaining holes.
5. Adjusting the Vertical and Top Door Seal Gaskets
i. Place a sheet of paper between the top surface of the door and the upper door seal gasket at various places between the seal and the door to determine where the seal needs to be tightened.If the seal is good, the paper should be held in place by the seal.If the seal is not snug enough, the gasket needs to be adjusted so that it makes better contact with the surface of the door.
ii. Turn the gasket adjusting screws clockwise to move the gasket closer toward the surface of the door.
iii. Continue until all the seals are lightly seated against the door, with no binding when opened and closed.
If you complete the above steps correctly, a sheet of paper should be held in place when placed between the door and the seal.
6. Installing the Automatic Threshold Seal
Finally, attach the automatic self-leveling threshold seal directly to the face of your solid-core door. Please note: Door threshold seals are not designed to seal directly on carpet. For best results threshold seals should seat onto a solid surface. The solid surface should be positioned above the level of the floor covering on either side of the door.
i. With the door closed, measure the distance between the insides of the two vertical door jamb seals at the bottom of the door.
ii. Measure and mark the cutting line on the end of the threshold piece seal away from the “actuator screw” end and place the aluminum channel side against the saw back stop.
iii. Gently pull back the rubber gasket material from the aluminum frame at the end to be cut (away from the adjustment screw) so the saw will cut ONLY the aluminum material (do NOT cut the rubber with the miter saw!).
iv. Cut the threshold piece on your miter saw.
Be careful to keep holding the rubber gasket away from the saw blade.
v. Push the rubber gasket straight back into the threshold seal inner channel, then with a pair of sharp scissors, trim the rubber gasket to leave an overhang of 1/8” beyond the channel on both ends of the piece – ensuring to keep the cuts clean, straight, and at precise 90° angles.
vi. The bottom seal must clear the floor covering – i.e. carpet, tile etc. – but NOT by more than 3/8” when the door is opened.
Note: the actual door threshold must be solid, smooth, straight, (as with aluminum or wood, for example),and nearly level (the threshold seal will self-level onto the threshold by up to +/- 3/8”), so use appropriate height spacers on the floor when you place the threshold door seal. A carpeted or other irregular threshold will not work.
vii. Place the bottom seal on top of the spacers – with the actuator screw towards the hinge-side of the door – and check that it fits snugly.
viii. Screw and drill the center hole to the door first, then drill and screw the remaining holes.Note: Be careful NOT to tighten the mounting screws too much – if they are too tight, the automatic gasket will not drop or self-level correctly.
Adjusting the Automatic Threshold Seal
i. Adjust the actuator screw so that the gasket drops completely to the threshold when the door is closed. (Maximum gasket drop = ¾”)
You can use a strong light source behind the door when checking your threshold adjustments. If no light shows through, you’ve sealed the threshold from sound as well.
Conclusion
When properly installed, the Door Seal Kit will effectively seal the gaps around your door.
For more information and a wealth of resources, please visit https://www.acousticalsurfaces.com/.

