Installing Sound Silencer Panels
Noise levels in large spaces with highly-reflective surfaces can quickly become overwhelming – especially if they are left acoustically untreated. The best strategy is to use acoustical absorber panels to reduce some of the energy of reflected sound as well as acoustical diffuser panels to help even it out.
By diminishing and spreading out the reflected sound energy, our ears and brains are better able to focus on the sound that reaches us directly from the source. It also makes it easier for people to speak with and hear one another. To learn more about how manipulating sound energy works, you can read our blog, How Sound Works in Rooms.
Rigid Porous ARPRO® Acoustical (P.E.P.P.) Planks for Walls and Ceilings
Our unique Sound Silencer™ Rigid Porous ARPRO® Acoustical (P.E.P.P.) Planks for Walls and Ceilings deliver high performance with both STC and NRC ratings, and they’re Class A fire rated. They work well in both interior and exterior applications; they’re lightweight and cleanable; and they resist moisture, impact, bacteria, and fungi. These sound absorber/sound blocker panels look great and are easy to install in either wall or ceiling applications for effective sound control.
Installing Sound Silencer Panels
You can easily install Sound Silencer™ panels (also referred to as ‘planks’) either by screwing or gluing them to walls or ceilings. Below, you’ll find step-by-step instructions, and for further visual reference, you can watch our video, Sound Silencer Install – Acoustical (P.E.P.P.) Planks for Walls and Ceilings.
Method 1 – Mounting Panel With Adhesive
Equipment and Materials:
- Sound Silencer™ Rigid Porous ARPRO® Acoustical (P.E.P.P.) Planks for Walls and Ceilings
- Noise S.T.O.P. ™ Contact Adhesive Spray
- Titebond GREENchoice Panel & Subfloor Adhesive
- Caulking gun
- Utility knife
- Tool to puncture inner seal of adhesive cartridge
- Measuring tape
- Marking pencil
- Level
Measuring and Marking the Wall to Place Your Panel in the Desired Location
- Measure and mark distance to one edge (side/horizontal) of desired panel location from nearest boundary (door frame, adjacent wall, etc.)
- Measure and mark distance to top of desired panel location from ceiling.
- Mark the vertical line at the side edge using a level (line length should be slightly shorter than the panel dimension).
- Mark a horizontal line at the top edge using a level (line length should be slightly shorter than panel dimension).
Applying Adhesive to the Back of the Panel
-
- Using a caulking gun, lay a bead of TitebondGREENchoice Panel & Subfloor Adhesive around the entire perimeter, about 1-1/2” from the edge on the back surface of the panel.
- Lay a bead of Panel Adhesive from corner-to-corner within the previously-applied rectangular adhesive perimeter creating an “X” pattern in the center.
- Apply Noise S.T.O.P.™ Contact Adhesive Spray inside the 4 triangular empty spaces between the adhesive lines of the perimeter and “X” adhesive beads from Step 2.
Note: DO NOT allow Contact adhesive to overspray Panel adhesive bead lines!
- Allow the spray adhesive to set for 4 minutes before attaching the panel to the wall.
Attaching the Panel to the Wall
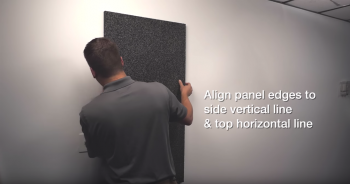
- Align panel edges to side vertical line and top horizontal line.
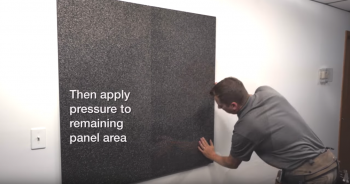
- Apply even and firm pressure on the side and top to set edge adhesive.
- Apply even and firm pressure to set adhesive for remaining area.
- Also apply pressure toward the seam when panels abut each other.
- Repeat steps 1 through 3 for the rest of your wall panels until complete.
Method 2 – Mounting Panel with Screws
Equipment and Materials:
- Sound Silencer™ Rigid Porous ARPRO® Acoustical (P.E.P.P.) Planks for Walls and Ceilings
- 1-½” dark decking or dark finishing screws
- Measuring tape
- Marking pencil
- Level
Measuring and Marking the Wall to Place Your Panel in the Desired Location
- Measure and mark distance to one edge (side/horizontal) of desired panel location from nearest boundary (already installed panel, door frame, adjacent wall, etc.)
- Measure and mark distance to top of desired panel location from ceiling – if you are adding a panel to a previously-installed one, you can mark the top edge horizontal line using the installed panel as a guide.
Attaching the Panel to the Wall

- Pre-set screws 2” from sides and corners. Note: dark decking or dark finishing screws work well.
- Align panel with side and top marks.
- Carefully drive in pre-set screws.
- Set screw heads flush with panel surface.
Installing Sound Silencer Panels in Conclusion
Congratulations – you’ve just improved the acoustics and décor for your application.
For more information on our wide range of acoustical products, please visit Acoustical Surfaces online or call us. One of our representatives will be ready to discuss your unique acoustical requirements.

