Installing Poly Max™ Polyester Acoustical Wall Panels
 If you’ve decided to acoustically treat a room, you can use absorptive acoustical wall panels to reduce some of the excess energy of reflected sound resulting in clearer and more-accurate sound.
By removing some of the reflected sound energy – but not all of it – our ears and brains are better able to focus on the direct sound while the residual reverberation complements our highly-developed perception of depth and location accuracy.
As illustrated in our video, How Sound Works in Rooms, you can use sound absorbers to reduce the strength of the reflected sound energy that would otherwise cause more destructive interference. Acoustical Surfaces offers many customizable, affordable, and highly effective wall panels to fit any acoustical treatment strategy.
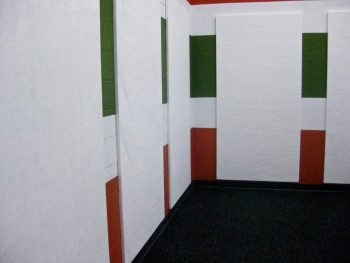
Use Poly Max™ Polyester Acoustical Wall and Ceiling Panels
Poly Max™ Polyester Acoustical Wall and Ceiling Panels are tackable, acoustically absorbent, non-allergenic, non-toxic, and they contain no chemical irritants or formaldehyde. These decorative acoustic tiles can also be printed with custom graphics to work with any design scheme.
Made of 60% Recycled Content (Polyethylene Terephthalate), Poly Max panels are impact resistant and Class A Fire Rated as well.
Installing a Poly Max Wall Panel
In this section, you’ll find a step-by-step set of instructions showing you how to install a Poly Max™ Polyester Acoustical Wall Panel. For visual reference, you can also view our instructional video, Poly Max Install – Polyester Acoustical Wall & Ceiling Panels.
You can use either of the following two methods to mount your Poly Max™ Acoustical Wall Panels:
- Using adhesives, or
- Using Z-clips and Z-bars
</br />Make sure you gather all acoustic panel mounting hardware that you need.
Method 1 – Mounting Poly Max Wall Panels Using Adhesives
Materials and Equipment
- Poly Max™ Polyester Acoustical Wall Panels
- Noise S.T.O.P.™ Contact Adhesive Spray
- Titebond GREENchoice Panel & Subfloor Adhesive
- Caulking gun
- Utility knife
- Tool to puncture inner seal of adhesive cartridge
- Measuring tape
- Marking pencil
- Level
Determine the area where the panel is to be installed on the wall surface.
Measuring and Marking the Wall to Place your Panel in the Desired Location
- Measure and mark distance to top of panel from ceiling – OR – from the center of the desired panel location
- Measure and mark distance to one edge (side/horizontal) of the panel location from nearest boundary (door frame, adjacent wall, etc.)
- Mark horizontal line at the top mark with a level (line length should be slightly shorter than the panel dimension)
- Mark the vertical line at the edge distance with a level (line length should be slightly shorter than panel dimension)
Applying Adhesive to the Back of the Panel
- Use a caulking gun to lay a bead of adhesive around the entire perimeter, about 1-1/2” from the edge with Titebond GREENchoice Panel & Subfloor Adhesive on the back surface of the panel.
- Lay a bead of Panel adhesive from corner to corner within the previously-applied rectangular adhesive perimeter creating an “X” pattern in the center.
- Apply Noise S.T.O.P.™ Contact Adhesive Spray inside the 4 empty spaces between the adhesive lines of the perimeter and “X” adhesive beads you just applied. Note: DO NOT allow Contact adhesive to overspray Panel adhesive bead lines!
- Allow the spray adhesive to set for 4 minutes before attaching the panel to the wall.
Attaching the Panel to the Wall
- Align panel edges to side vertical line and top horizontal line.
- Apply even and firm pressure on the side & top to set edge adhesive.
- Apply even and firm pressure to set adhesive for remaining area.
- Ensure that the panel is flush with the wall and that the adhesive is evenly seated.
Method 2 – Mounting Poly Max Wall Panels Using Z-clips
Materials and Equipment
- Poly Max™ Polyester Acoustical Wall Panels
- Power Drill
- ¾” Z-Clip screws (supplied)
- Drywall anchors (supplied)
- 1 ½” oval-head screws (supplied)
- Measuring tape
- >Marking pencil
- Level
- 2 Z-Bars (supplied)
- 4 Z-Clips (supplied)
Attaching the Z-Clips to the Back of the Poly Max Wall Panel
- Beginning at the Z-Clip center holes, screw each of the 4 Z-Clips at the top edges of the 4 pre-marked squares on the back of the panel with ¾” screws.
- Position a Z-Bar horizontally in each of the top and bottom Z-Clip pairs (with Z-Bar hole-side facing down) to ensure the two Z-Clip pairs are level and aligned with each other.
- Screw in the remaining ¾” screws on the 4 panel-mount Z-Clips.
- Leave the two Z-Bars positioned in the Z-Clips for the next set of measurements.
Measuring and Marking the Wall
- Measure from the top edge of the panel to the bottom of the top Z-bar and write down that measurement. (Note: You’ll need this value in Step #6, below.)
- Measure from the top edge of the panel to the bottom of the bottom Z-bar, and write down that measurement as well. (Note: You’ll need this value in Step #7, below.)
- On the wall, measure out and mark the side position for where you want the edge of the panel.
- Measure and mark the top position for where you want the panel on the wall as well.
- Use a level to draw both vertical and horizontal lines at the measured positions on the wall (the lines should be slightly shorter than the panel dimensions).
- Starting at the top horizontal line on the wall, measure down the wall to locate the top Z-Bar placement. (Note: Use the measurement from Step #1, above.)
- Again, starting at the top horizontal line on the wall, measure down the wall to locate the bottom Z-Bar. (Note: Use the measurement from Step #2, above.)
- Mark the top and bottom horizontal Z-Bar lines on the wall using a level (the lines should be slightly shorter than the Z-Bar dimensions).
- Mark the centers of the top and bottom Z-Bar lines on the wall.
- Holding the Z-Bars level with and centered on the marked lines, punch the center and side drilling-guide holes for both top and bottom Z-Bars.
- Drill in the center and side wall anchors at the drilling-guide holes for both top and bottom Z-Bars.
- With the Z-Bar in position, screw the 1-1/2” center and side screws into the wall anchors for both top and bottom Z-Bars.
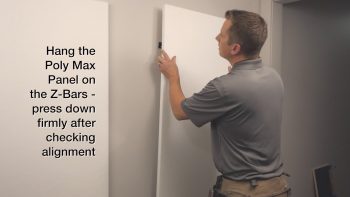
Hanging the Poly Max Panel on the Wall-Mounted Z-Bars
- Now that you have attached the Z-Bars to the wall, position the Poly Max panel on the wall with the panel edge at the side mark location.
- With the Z-Clips above and “resting on” the Z-Bars; press downward firmly but gently on the top of the panel to seat the Z-Clips into the Z-Bars so that the Z-Clips fit snugly into the Z-Bars.
- Check the alignment of the panel and, if needed, tap sideways to adjust the panel left or right at the top or bottom to achieve level and plumb.
Conclusion
Whatever your acoustical project, we can help you with know-how, experience, design ideas, and a wide range of leading-edge acoustical products.
For further blogs, tutorials, and product descriptions, please visit us at AcousticalSurfaces.com or contact us directly, and one of our representatives will be happy to help you with any questions you may have.

