Installing Fabric-Wrapped Acoustic Panels
Whether you’re treating an office, a professional recording space, or a home entertainment room, acoustical treatments involve only two types of acoustical panels: absorbers and diffusers. Combining absorption and diffusion results in clearer, more satisfying acoustic experiences because it maintains some of the reverberation that is key to our ability to form accurate sound images.
The key to good room acoustics is finding the right mix and placement of acoustic diffusers and absorbers. By diminishing some of the reflected sound energy – but not all of it – our ears and brains are better able to focus on the direct sound while the remaining reverberation complements our highly-developed perception of depth and location.
Read First: What are Fiberglass Acoustic Panels?
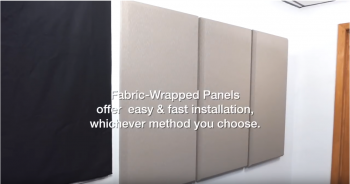
Fabric-Wrapped Acoustical Panels
As illustrated in our video, “How Sound Works (In Rooms),” you can use sound absorbers to reduce the strength of the reflected sound energy that would otherwise cause more destructive interference. Acoustical Surfaces offers many customizable, affordable, and highly-effective absorber panels to fit any acoustical treatment strategy.
NOISE S.T.O.P. FABRISORB™ fabric-wrapped acoustical panels are affordable fiberglass sound absorbers that deliver high-performance value at an affordable cost. You can install them on nearly any wall and ceiling surface to reduce echo and reverberation. They come in many color and size combinations and do a great job of taming overly-reflective rooms.
CFAB Cellulose Sound Absorber Panels are also cost-effective, offering great performance at a low price. They absorb and control noise and reduce airborne sound transmission. In addition, they are Class A Fire Rated, resist mold growth, and are easy to install.
Sound Silencer™ acoustical panels are also Class A fire rated with STC and NRC ratings alike. These panels provide high-performance sound blocking and absorption.
Installing a Fabric-Wrapped Panel
 Now that you’ve done your research and decided how many acoustic fabric panels to use, as well as where to locate them, gather all of your acoustic panel mounting hardware and read on to learn how to install them. For further visual reference, please watch our video, Fabric Wrapped Panel Install.
You can choose either of the two following installation systems:
- Rotofast Snap-on Mounting System, or
- Z-Clip System
Method 1: Installing a Fabric-Wrapped Panel Using Rotofast Snap-On Mounting System
Equipment and Materials:
- NOISE S.T.O.P. FABRISORB™ Decorative Fabric Wrapped Custom Acoustical Wall Panels
- Snap-on mounting hardware (optional at extra cost – must be specified when ordering)
- Power drill
- 1 ½” wood screws
- Measuring tape
- Marking pencil
Measuring
- Measure from the edge of the nearest boundary (wall, window, or door) to the side-edge line at the desired location of the first panel.
- Measure and mark the distance from the floor to the desired top location of the panel.
- Mark the horizontal top line for the panel location using a level.
- Mark the vertical edge line for the panel location using a level.
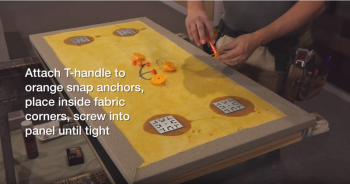
Attaching T-Handle to Back of Panel
-
- Attach red T-handle into back opening of orange snap anchor.
- Place snap anchor center point 2-3 inches inside edge of fabric wrap-over in first corner.
- Screw into panel until tight.
NOTE: Do Not over-tighten! Snap anchor collars should be flush with panel.
- Remove T-handle, add red marker plug into opening after snap anchor is tight/flush with back of panel.
- Repeat steps 1 through 4 for the remaining 3 corner snap anchors.
Attaching Panel to Wall
- Position panel at side vertical and top horizontal lines on wall.
- Lightly hit panel at corners to indent wall at marker plugs.
- Remove panel from wall, remove marker plugs from back of panel.
- Indents from marker plugs indicate wall anchor locations.
- Screw wall anchors into the indentation marks from Step 2.
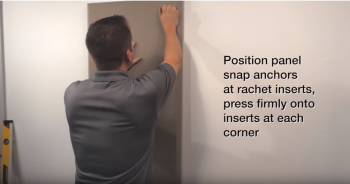
- Screw black anchor ratchet inserts into wall anchors.
- Position panel snap anchors at ratchet inserts.
- Press panel firmly onto inserts at each corner.
Method 2 – Installing a Fabric-Wrapped Wall Panel Using Z-Clip Mounting System
Materials and Equipment:
- NOISE S.T.O.P. FABRISORB™ Decorative Fabric Wrapped Custom Acoustical Wall Panels
- Power drill
- 1 ½” wood screws
- Measuring tape
- Marking pencil
- Z-Bars (optional at extra cost – must be specified when ordering)
- Z-Clips (optional at extra cost – must be specified when ordering)
- Level
Attaching the Z-Clips to the Back of Fabric-Covered Wall Panel
- Beginning at the Z-Clip center holes, screw each of the 4 Z-Clips into the round center holes of the 4 pre-installed square metal plates in each corner on the back of the panel.
- Position the 2 Z-Bars snugly into each of the top and bottom pairs of Z-Clips to ensure the top and bottom pairs of Z-Clips are aligned with each other.
- Add a 2nd screw to each Z-Clip at the outside hole location.
- Measure from the top of the panel to the top of each Z-Bar to ensure they are parallel with each other and the panel top and bottom edges.
- Leave the Z-Bars positioned in the Z-Clips for the next set of measurements.
Measuring and Marking the Wall
-
- Measure from the top edge of the panel to the bottom of the top Z-bar, and write down that measurement.
Note: You’ll need this value in Step # 6, below.
-
- Measure from the top edge of the panel to the bottom of the bottom Z-bar, and write down that measurement as well.
Note: You’ll need this value in Step #7, below.
-
- Remove the Z-Bars.
- On the wall, measure and mark the side-edge position for the desired location of the panel.
- On the wall, measure and mark the top-edge position for the desired location of the panel.
- Use a level to draw both vertical and horizontal lines at the measured positions on the wall.
- Starting at the top horizontal line on the wall, measure down the wall to locate the top Z-Bar placement location.
Note: use the measurement from Step # 1, above.
-
- Starting at the top horizontal line on the wall, measure down the wall to locate the bottom Z-Bar placement location.
Note: use the measurement from Step #2, above.
- Mark the top and bottom horizontal Z-Bar lines on the wall using a level.
- Mark the centers of the top and bottom Z-Bar lines from the side-edge line on the wall.
- Place the top Z-Bar on the scribed horizontal line, positioning the center hole at the marked center of the line; repeat for the bottom Z-Bar.
- Punch an indentation into the wall surface at the center and side holes for both top and bottom Z-Bars.
- At each wall indentation, drill in the center and side wall anchors for both top and bottom Z-Bars.
- Screw in the center and side screws for both top and bottom Z-Bars.
Attaching the Fabric-Wrapped Panels to the Wall
After attaching the Z-Bars to the wall, simply position the Fabric Wrapped Panel on the wall centered on the Z-Clips. Press down gently on the top of the panel until it fits snugly into the Z-Bars. Measure from the panel edge to the nearest boundary to check for plumb and level. Adjust the panel with light side taps to position it as needed.
Read More: 6 Smart Uses for Fabric Wrapped Acoustic Panels
Conclusion
Congratulations! You’ve just made one of the best investments toward improving the sound quality of your home, office, or recording environment.
For further blogs, tutorials, and product descriptions, please visit us at AcousticalSurfaces.com or contact us directly, and one of our representatives will be happy to help you with any questions you may have.

