16 Acoustic Performance Checklist Items for Designers, Facility Managers & DIY Fixes
An effective acoustic performance checklist helps you avoid one of the most common (and costly) mistakes in acoustics: solving the wrong problem. Spaces rarely suffer from just one issue. Instead, acoustic performance is a balance of three elements – absorption (echo control), blocking (sound isolation), and covering (sound masking). When one is overemphasized or misunderstood, results can fall short of expectations.
One of the most common issues is assuming all sound problems are the same. In reality, echo and reverberation are caused by sound reflecting within a space, while sound transmission is about energy moving through walls, ceilings, or floors. These require completely different approaches. A room that feels loud and chaotic may not need thicker walls – it likely needs more absorption. On the other hand, a quiet room where conversations are clearly heard next door won’t benefit from panels alone.
This is why a structured acoustic performance checklist is so valuable. It forces you to diagnose before you prescribe, helping ensure that time and budget are spent on solutions that actually address the root cause instead of just treating symptoms.
This guide is designed to give designers, facility managers, and hands-on problem-solvers a practical, real-world framework. Whether you’re improving room acoustics in a conference space, dialing in open office acoustics, or trying to reduce echo in large rooms, these checklist items will help you diagnose and fix issues with confidence.
The Top 16 Acoustic Performance Checklist Items
1) Define the goal: echo control, speech privacy, or noise reduction?
Every successful project starts with clarity. Too often, people confuse sound absorption vs soundproofing, leading to solutions that don’t address the actual complaint. Echo issues require absorption, while hearing conversations through walls requires isolation.
Start by identifying the real problem. Is the room ringy, muddy, or unclear due to echo, or is sound leaking between spaces? This distinction drives everything from material selection to installation approach.
What to check: What’s the complaint – echo and poor clarity, or sound traveling between rooms?
2) Measure (or estimate) your room size, surfaces, and use-case
Every acoustic checklist for rooms should include basic dimensions and surface types. A small office behaves very differently from a gymnasium or classroom. Volume, layout, and function all influence how sound behaves.
For example, classroom acoustics prioritize speech clarity, while gymnasium acoustic treatment focuses on controlling excessive reverberation. Understanding the use-case ensures your targets and solutions are aligned.
A common failure point is applying a one-size-fits-all approach across different room types within the same facility. For instance, treating a conference room, hallway, and workspace with the same amount and type of absorption often leads to inconsistent results – some spaces feel over-treated while others remain noisy and difficult to use.
A better approach is to prioritize based on function. Start with spaces where communication clarity or privacy matters most, then scale treatment strategies accordingly. This ensures your budget is applied where it has the greatest impact.
What to check: Do you know room dimensions, ceiling height, surface materials, and primary function?
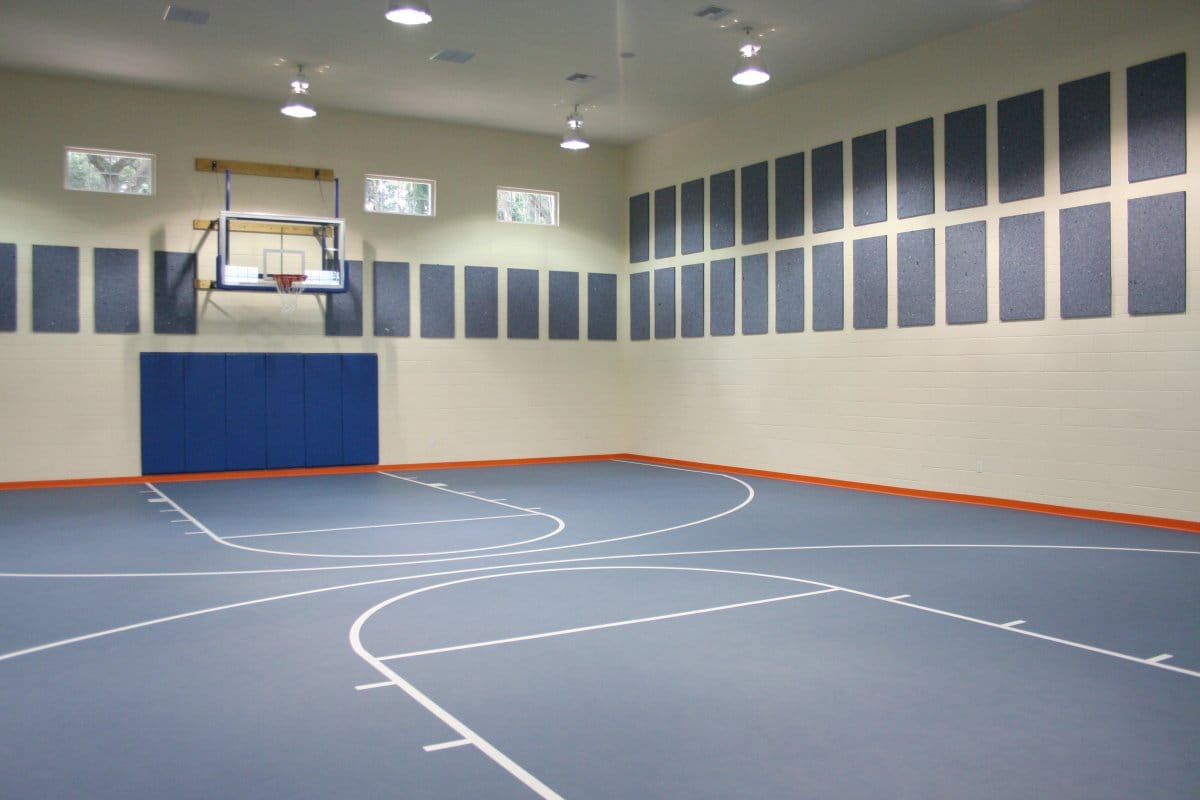
3) Identify your biggest reflective surfaces (walls, glass, ceiling, floor)
Large, hard surfaces are the primary drivers of echo. Surfaces like glass walls, concrete floors, and exposed ceilings all reflect sound energy back into the space, increasing reverberation.
Focus first on surfaces that cover the most area. Treating small sections won’t meaningfully impact performance if the majority of the room remains reflective.
What to check: Which surfaces are hard, flat, and uninterrupted?
4) Set a reverberation target (even a rough one)
You don’t need lab-grade measurements to make progress. Setting a general reverberation control target helps guide how much absorption you need.
If speech clarity is the priority, shorter reverberation times typically lead to better speech intelligibility improvement. Spaces like conference rooms and classrooms benefit from tighter, more controlled acoustics.
In practical terms, this means reducing how long sound lingers after a person stops speaking. Excessive reverberation causes syllables to overlap, making speech harder to understand even at short distances. This is why reverberation control is often the first and most impactful step in improving overall room performance, especially in spaces where communication is the priority.
What to check: Is your space optimized for clarity or ambience?
5) Treat the ceiling first in big/open rooms
In large or open environments, the ceiling is often the most impactful place to start. It’s typically the largest uninterrupted surface and a major contributor to echo.
Ceiling-mounted panels, not ceiling clouds, are usually the most practical and effective solution. For taller spaces, baffles for high ceilings can also help introduce vertical absorption without interfering with lighting, HVAC vents, or fire suppression sprinkler systems.
What to check: Have you addressed the largest overhead surface?

6) Confirm absorption coverage percentage (don’t under-buy)
One common mistake in acoustic treatment is underestimating how much material is needed. Small decorative installations rarely move the needle.
Think in terms of surface coverage. Effective acoustic materials should cover a meaningful percentage of the room to achieve noticeable results.
What to check: Does your treatment cover enough area to matter?
7) Put absorption where the sound energy actually is (near talkers, paths)
Sound doesn’t just exist randomly – it follows paths. In offices and collaborative spaces, focus on areas where conversations happen most often.
That said, placement doesn’t dramatically change performance in most cases. The primary reason to position panels above shoulder height is durability and reduced contact, not acoustic efficiency.
This is especially relevant in open office acoustics and conference room acoustic treatment strategies. When reviewing acoustic panel placement tips, it’s important to separate best practices from misconceptions. While you’ll often see recommendations to place panels at specific heights or directly at ear level, the reality is that total coverage matters far more than exact positioning. In most environments, evenly distributed absorption across available surfaces will outperform small, precisely placed installations.
The main exception is for practical considerations – keeping panels above reach helps prevent damage and maintains long-term performance in high-traffic areas.
What to check: Are your panels positioned where they’ll stay effective and intact?
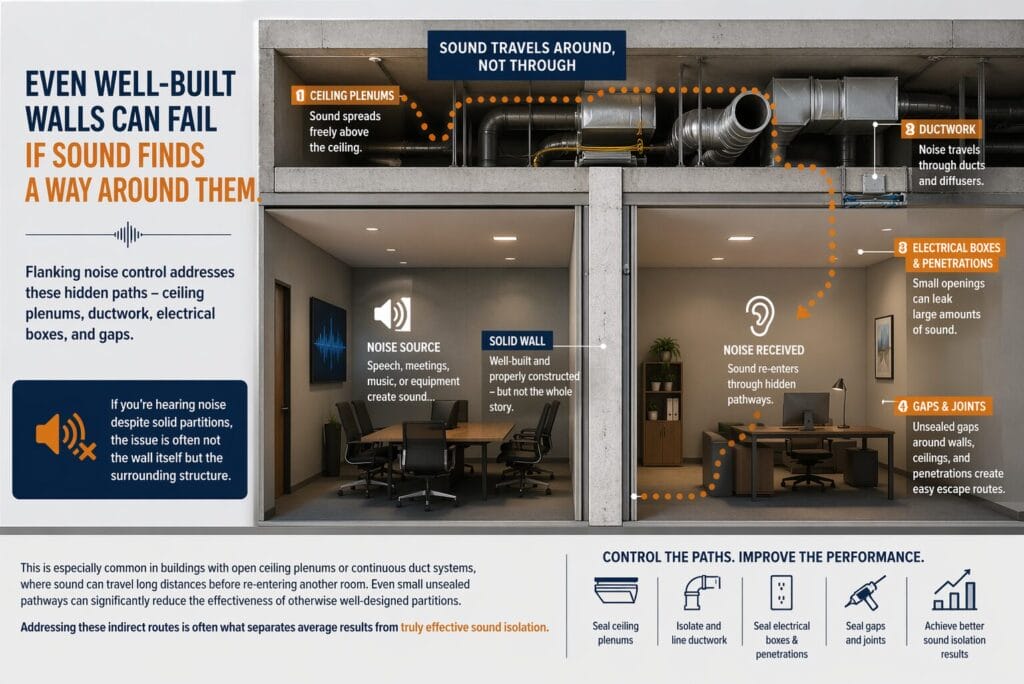
8) Don’t ignore flanking noise paths (the hidden leaks)
Even well-built walls can fail if sound finds a way around them. Flanking noise control addresses these hidden paths – ceiling plenums, ductwork, electrical boxes, and gaps.
If you’re hearing noise despite solid partitions, the issue is often not the wall itself but the surrounding structure. This is especially common in buildings with open ceiling plenums or continuous duct systems, where sound can travel long distances before re-entering another room. Even small unsealed pathways can significantly reduce the effectiveness of otherwise well-designed partitions. Addressing these indirect routes is often what separates average results from truly effective sound isolation.
What to check: Could sound be traveling above, below, or around your barriers?
9) Seal gaps and penetrations before you “add more product”
Before adding more panels or insulation, address the basics. Small gaps can significantly reduce isolation performance.
Using acoustic sealant for soundproofing at joints, seams, and penetrations helps close these weak points and improves overall effectiveness.
What to check: Are all seams, edges, and penetrations properly sealed?
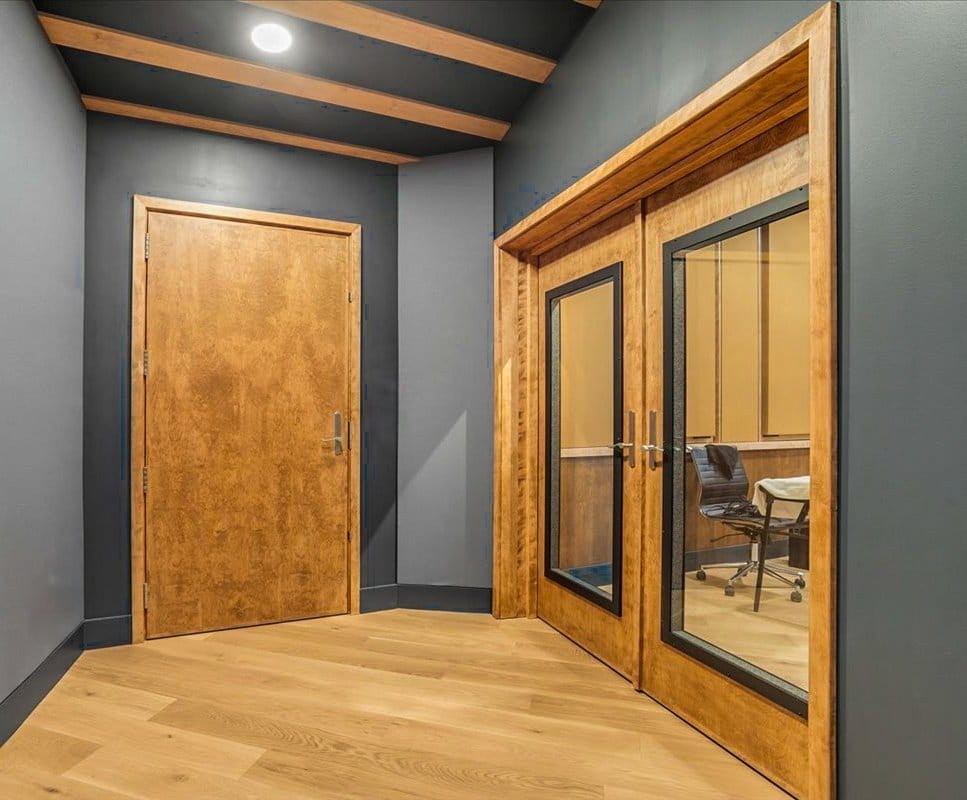
10) Upgrade doors if privacy matters (they’re usually the weak link)
Doors are often the weakest part of any sound-isolation strategy. Even well-constructed walls can be compromised by hollow-core or poorly sealed doors.
A soundproof door with proper seals can dramatically improve privacy in offices, counseling rooms, and meeting spaces.
What to check: Is your door the right type and weight, based on the amount of sound you need to block – and is it sealed properly?
11) Address floor/ceiling impact noise in multi-level buildings
Footsteps, dropped objects, and movement create floor impact noise that travels between levels. This is especially noticeable in apartments, offices, and mixed-use buildings.
Installing acoustic underlayment beneath flooring helps reduce these vibrations and improve comfort for occupants below. Understanding STC and IIC basics can also help you evaluate both airborne and impact sound performance.
What to check: Are you addressing both airborne and impact noise?
12) Treat HVAC noise and cross-talk
Mechanical systems are a frequent source of background noise and unintended sound transmission. Effective HVAC noise control acoustics includes lining ducts and minimizing direct sound paths.
Cross-talk between rooms can occur through shared ductwork, undermining privacy efforts. In many cases, this issue isn’t obvious until the space is occupied. Conversations can travel through ducts and reappear in adjacent rooms, even when walls are properly constructed. Adding duct liners, in-line duct silencers, or breaks in the duct path helps disrupt this transmission and improves both privacy and overall acoustic comfort.
What to check: Are ducts lined, and are there breaks preventing sound transfer?
13) Consider sound masking only after absorption + blocking basics
There’s often confusion around sound masking vs acoustic treatment. Masking doesn’t fix echo or block sound – it simply adds background noise to make speech less noticeable.
It works best in environments like open offices and corridors, but only after absorption and isolation are properly addressed.
What to check: Have you solved echo and leakage before adding masking?
14) Confirm fire rating, durability, and cleanability requirements
Performance isn’t just about acoustics – it’s also about compliance and longevity. Most spaces require materials with a Class A fire rating, especially in public or institutional environments.
Durability and cleanability are equally important in schools, healthcare facilities, and high-traffic areas.
What to check: Do your materials meet safety and maintenance requirements?

15) Choose products that fit your environment (humidity, abuse, aesthetics)
Different environments call for different solutions. Cotton or polyester panels, fabric-wrapped systems, and wood fiber products each offer unique benefits.
Consider humidity, potential for impact, and design goals when selecting materials. The right product should perform well and integrate seamlessly into the space.
What to check: Are your materials suited for the conditions and use?
16) Verify results with a simple before/after test plan
Even simple testing can validate improvements. Clap tests provide a quick sense of echo reduction, while phone apps can estimate reverberation changes.
Walk-and-talk tests are useful for assessing speech privacy. These practical methods help confirm that your efforts are delivering real results.
What to check:Do you have a baseline and a way to measure improvement?
One-Page Acoustic Performance Checklist
To make implementation easier, we recommend printing our one-page copy of this acoustic performance checklist that you can use on-site or during planning meetings. Having a quick reference helps ensure nothing is overlooked – from reverberation control to flanking noise control and everything in between.
If you’re unsure where to start, consider sharing your room dimensions, photos, and key concerns. From there, our team can help you build a targeted plan that addresses room acoustics, improves clarity, and supports long-term performance.
Quick Reference Table
| Checklist Item | Why It Matters | Typical Fix | Product Category |
| Define goal | Avoid wrong solution | Match issue type | Panels, barriers |
| Room assessment | Guides design | Measure space | All categories |
| Reflective surfaces | Drive echo | Add absorption | Wall/ceiling panels |
| Reverberation target | Sets benchmark | Adjust coverage | Absorptive materials |
| Ceiling treatment | High impact | Install panels | Ceiling systems |
| Coverage percentage | Prevent underperformance | Increase area | Panels, baffles |
| Sound paths | Improve effectiveness | Strategic placement | Wall/ceiling panels |
| Flanking paths | Hidden leaks | Seal/redirect | Barriers, sealants |
| Gap sealing | Improves isolation | Use sealant | Acoustic sealants |
| Doors | Weak link | Upgrade assembly | Sound-rated doors |
| Impact noise | Multi-level issues | Add underlayment | Flooring systems |
| HVAC noise | Background/cross-talk | Line ducts | Acoustic liners |
| Sound masking | Privacy support | Masking system | Masking systems |
| Fire/durability | Compliance | Choose rated materials | Class A products |
| Product fit | Environment-specific | Match conditions | Various materials |
| Testing | Validate results | Before/after checks | Measurement tools |
A well-structured acoustic performance checklist does more than guide product selection – it ensures you’re solving the right problem, in the right way, with lasting results.