Broadcast Studio Acoustics: How to Create a Pro-Level Sound Environment
The professional-grade audio quality in television and video production doesn’t happen by chance. Audio professionals engineer studio acoustics so every spoken word, ambient cue, and sound effect is captured with clarity and consistency. TV studio noise control–such as managing HVAC hums, equipment buzz, and unwanted reflections–is essential to maintaining clean audio tracks. In a broadcast studio, controlling room reflections, background noise, and standing waves is critical to avoid audio artifacts that can distract viewers or compromise production value. Through precise use of acoustic panels, bass traps, and diffusers, engineers masterfully create a balanced yet focused environment for reliable monitoring and high-performance recording.
Why Acoustical Treatment Matters in TV Studios
Acoustical treatments and soundproofing measures serve distinct but complementary roles in professional broadcast environments and home TV studio setup acoustics alike. Broadcast studio soundproofing–focused on sound isolation and transmission loss–prevents external noise from entering the studio and internal audio from leaking out. Acoustic treatments (like panels and diffusers), on the other hand, target sound behavior inside the room, like managing reflections, flutter echo, and standing waves to ensure a clear, intelligible soundstage. Both are essential to controlling TV studio noise and creating a consistent environment for live and recorded production.
In addition to technical performance, professional studios must meet regulatory requirements such as FCC guidelines and deliver consistent, high-quality audio that enhances viewer experience and production reliability.
Key Types of Studio Noise to Manage
To achieve clean, professional-grade audio, studios must address several types of noise. These typically fall into three primary categories: airborne noise, structure-borne noise, and internal reflections and reverb. Each presents unique challenges and requires tailored treatment strategies to maintain recording clarity and broadcast integrity.
Airborne Noise
Airborne noise includes external sounds such as traffic, HVAC systems, or voices from nearby rooms. In broadcast studios, effective ambient noise reduction in filming prevents these unwanted sounds from leaking in through walls, ceilings, or shared floors, preserving the clarity of on-mic dialogue and sound effects.
Structure-Borne Noise
This type of noise travels through the building structure often caused by vibrations from mechanical equipment, foot traffic, plumbing systems, rooftop HVAC units, or elevator machinery. If untreated, these vibrations can enter sensitive recording areas via floors, walls, or supports, resulting in low-frequency rumble and background interference.
Internal Reflections and Reverb
Sound waves bouncing off untreated surfaces cause internal reflections and reverb, which smear audio detail and reduce vocal intelligibility. Effective echo reduction in studios is essential to prevent these issues. In TV studios, this leads to muddy recordings, phase issues, and poor mic pickup, ultimately degrading broadcast quality.
Core Materials and Treatments for TV Studios
Addressing airborne noise, structure-borne vibration, and internal reflections requires a combination of acoustic treatments, including effective isolation and sound absorption for studios. While each type of TV studio noise demands a specific solution, the most effective approach is a layered, integrated design that treats the studio environment as a whole. From sound isolation materials to absorption and diffusion panels, each element plays a role in delivering the controlled, intelligible sound demanded in professional broadcast settings. Here are some of the best materials for studio acoustics:
Acoustic Wall or Ceiling Panels
Acoustic wall or ceiling panels are essential for managing early reflections and controlling mid- to high-frequency sound energy. Unlike cheaper acoustic foam, proper acoustic panels (such as fabric wrapped fiberglass panes or cotton, cellulsoe or polyester fiber based products) typically offer better absorption ratings and durability, making them more effective for professional setups–a key consideration in the acoustic foam vs acoustic panels debate. These panels improve speech intelligibility and clarity on microphones by minimizing flutter echo and reducing overall reverberation. Look for acoustic panels with high NRC (Noise Reduction Coefficient) ratings, and install them at primary reflection points along walls. In more acoustically sensitive environments, integrating curved diffuser panels can further optimize the sound field by scattering reflections rather than eliminating them–ideal for maintaining natural room energy while improving intelligibility.
Bass Traps and Corner Treatment
Low-frequency buildup is a common challenge in studios and must be specifically addressed to ensure accurate monitoring and clean recordings. Bass traps, particularly in corners where modal energy tends to concentrate, are critical. Products like CornerSorber low-frequency absorbers–the only commercially available corner traps tested down to 40 Hz–are highly effective in controlling problematic room modes without over-deadening the space.
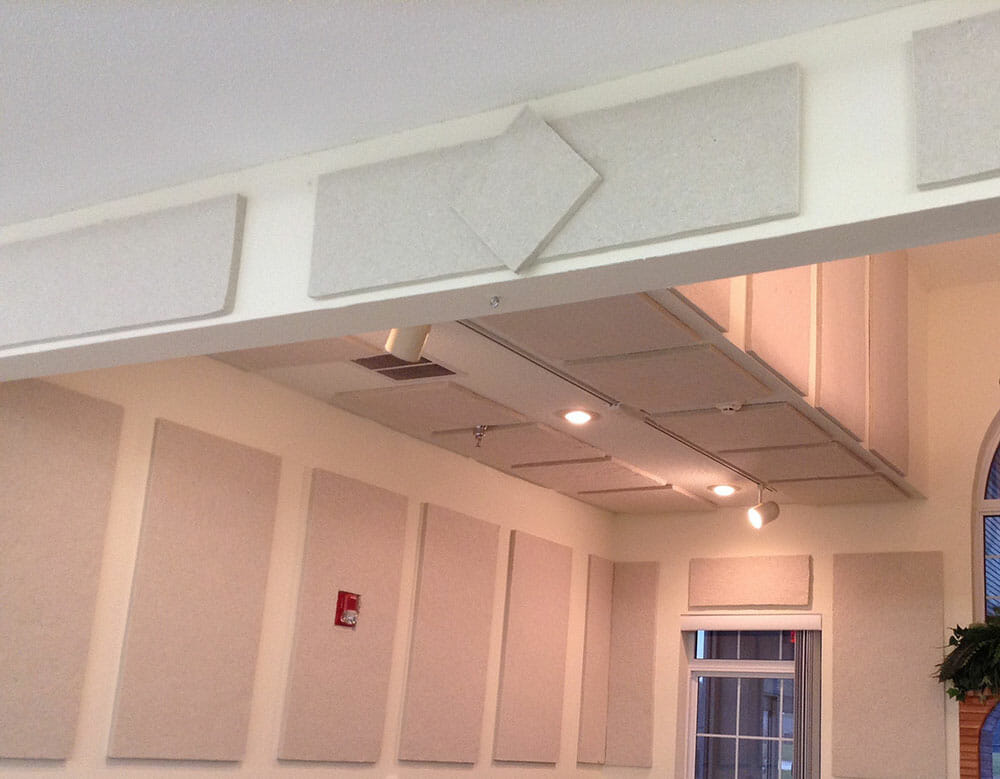
Ceiling Treatments and Clouds
Ceiling-mounted panels and hanging acoustic clouds help suppress flutter echo and control reverberation from overhead surfaces. In studios with fire suppression systems, make sure that the hanging clouds don’t obstruct sprinkler coverage. If sprinkler clearance is an issue, direct-mount ceiling panels offer a compliant alternative that still delivers effective acoustic performance.

Soundproof Doors and Windows
High-performance doors and windows are key in keeping external noise out and internal sound in. The best soundproof doors for studios are solid-core doors with high STC (Sound Transmission Class) ratings, adjustable perimeter seals, and automatic door bottoms to ensure a tight seal. Studio windows should feature laminated or double-laminated glass with proper spacing to reduce sound transmission and be installed correctly to prevent flanking paths.
Floating Floors and Isolation Pads
To combat mechanical noise and structure-borne vibration, professional studios often rely on isolation pads or a floating floor for soundproofing. Mounting HVAC equipment, elevators, or other mechanical systems on spring or neoprene isolators significantly reduces the transmission of vibrations. Pro-level studios may even saw-cut the concrete slab around the studio footprint and fill the cut with sealant, acoustically decoupling the floor from the surrounding structure. Floors are commonly floated using Acoustik underlayments, even when installed over a slab-on-grade with a wood floor directly on top.
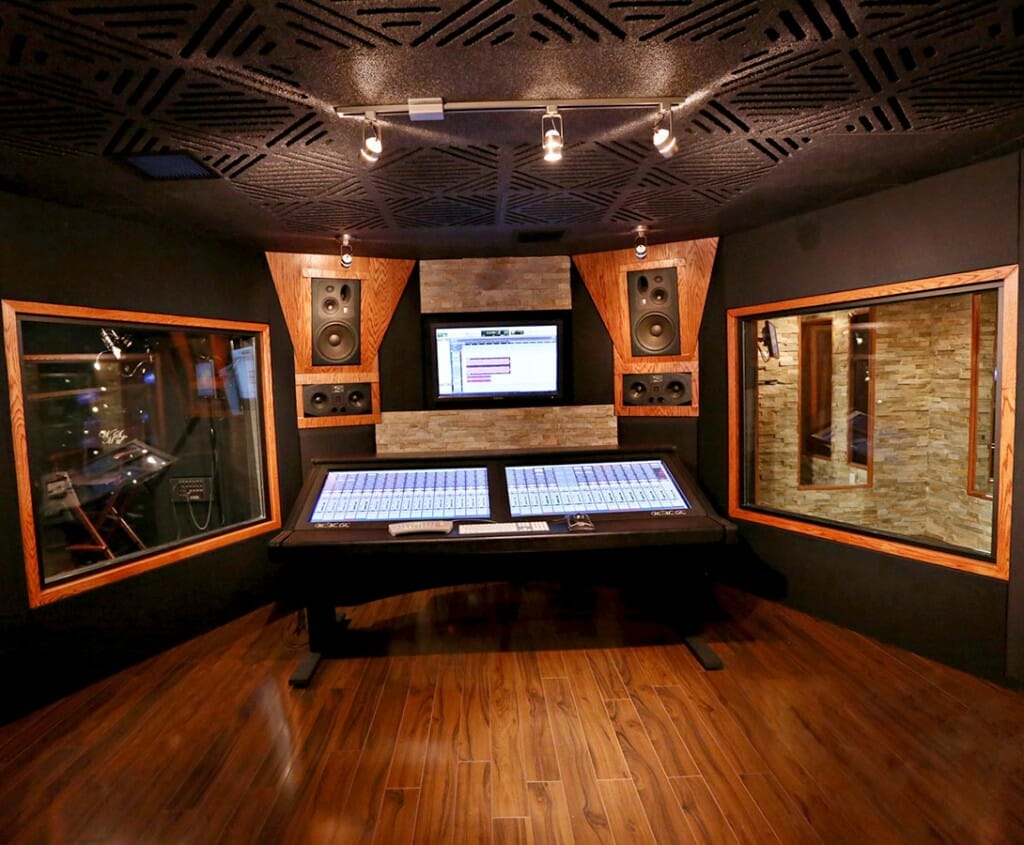
Designing an Acoustic Layout for TV Studios
The success of any broadcast environment begins with a well-planned acoustic treatment and studio soundproofing layout tailored to the specific function of the studio, whether it’s a news set, talk show stage, or green screen production space, where specialized green screen studio soundproofing is important. Understanding how to soundproof a TV studio effectively is the first step toward minimizing external noise and internal reflections that could interfere with production.
Start by identifying problematic reflective surfaces–large walls, ceilings, or windows near talent zones–that can be treated with broadband absorptive panels. These types of products are generally intended to reduce mid- to high-frequency reflections that cloud vocal intelligibility and support microphone echo prevention, especially around host desks or interview setups. Unlike in audiophile rooms, pinpointing first reflection points isn’t the first priority here. Instead, focus on managing large reflective surfaces that affect microphone pickup and clarity on set.
You should also consider the cubic volume of the room and the materials that make up its surfaces. Larger rooms with parallel walls and hard floors often need low-frequency control and overhead treatments to prevent buildup and echo. Smaller studios, while more contained, can suffer from congestion and flutter echo without ceiling treatments or bass traps.
Finally, for multi-purpose or reconfigurable studios, modular treatment options like portable acoustic Gobo panels offer flexibility. These movable sound absorbers help isolate vocal zones and reduce noise transfer between areas without requiring permanent installation.
Broadcast vs Film Set Acoustic (On-Location Sound)
Acoustic strategies differ significantly between controlled broadcast studios and unpredictable on-location film sets. Permanent studios are purpose-built environments where sound can be managed with fixed acoustical treatments like absorptive wall treatments, ceiling clouds, construction isolation materials, and sound-rated doors. In contrast, location shoots often take place in acoustically hostile settings with little to no treatment, forcing audio teams to work around environmental variables in real time.
On-location sound is challenging due to ambient noise, including traffic, HVAC hum, crowd chatter, wind, or reflective surfaces like concrete walls or glass. Without built-in treatments, crews rely on portable solutions like acoustic blankets and Gobos to create sound control zones. Strategic mic selection is also key: lavaliers are discreet and close to the source, reducing room noise pickup, while shotgun mics help reject off-axis noise but still require careful placement in noisy or reflective environments.
This table shows some of the core differences between studio and on-location acoustic strategies:
| Aspect | Broadcast Studio | On-Location Film Set |
| Acoustic Environment | Controlled, treated environment | Variable and uncontrolled |
| Primary Challenges | Internal reflections, HVAC, isolation | Ambient noise, reflections, lack of treatment |
| Typical Treatments | Fixed panels, bass traps, isolated construction | Portable blankets, baffles, Gobos |
| Mic Strategy | Boom mics, lavs with treated room support | Lavs, shotguns with creative noise mitigation |
| Flexibility Needs | Static configuration | Highly adaptable, mobile setup |
Common Mistakes in Studio Acoustic Design
Even with pro-level gear, poor acoustics can quickly ruin audio quality. Here are some key mistakes to avoid:
- Relying on foam without real absorption metrics – Cheap foam often lacks tested NRC ratings and does little for low frequencies, leading to ineffective treatment.
- Ignoring low-frequency buildup – Bass issues are common in small studios. Skipping bass traps or proper corner treatment results in muddy audio. Products like CornerSorber absorb down to 40 Hz and help control low-end resonance.
- Under-treating ceilings – Overhead reflections cause flutter echo and muddy vocals. Use ceiling clouds or direct-mount panels to reduce reflections.
- Poor mic placement due to untreated surfaces – Reflective walls limit your mic placement options. Treating key surfaces offers more flexibility and improves clarity.
Pro Tips and Tools for Acoustic Calibration
Once your studio is treated, fine-tuning is key to achieving broadcast-quality sound. These tools and practices help dial in performance:
- Room EQ Wizard (REW) – Use this free software for measuring frequency response, reverb time, and phase issues. Great for spotting trouble areas and validating treatment results.
- SPL Meters & Pink Noise Generators – Use an SPL meter with a pink noise generator to balance levels across the room and check for uneven reflections or hotspots.
- Consult a Pro – Acoustic consultants or studio engineers can provide expert guidance, especially for larger or multi-use spaces.
- Post-Install Adjustments – Acoustic panels may need repositioning after initial testing. Modular options like Gobos make it easy to tweak layout for changing setups or show formats.
Final Thoughts: Build a Studio That Sounds as Good as it Looks
A great video means little without equally polished sound. If you’re looking at how to improve studio sound, investing in professional video studio acoustics, including acoustical treatment and quiet room design for video production facilities, is essential for managing TV studio noise–from airborne distractions to low-frequency rumble–ensuring clean recordings and consistent mic performance. Thoughtful sound design supports smoother production workflows and elevates the overall broadcast quality.
Whether you’re building a brand new studio or upgrading an existing space, addressing acoustics adds long-term value, improves the viewer experience, and helps meet industry standards.
Need help? Connect with one of our team members for expert guidance and trusted products to create a studio that sounds as professional as it looks.