The Ultimate Guide to Reducing AC and HVAC Noise: Quieting Condensers and Compressors
HVAC noise can throw a wrench in an otherwise comfortable environment. We turn these systems on for temperature control, but aging equipment often creates noise that can become a problem in itself. Luckily, there are some simple noise reduction tips that can help you enjoy your forced air again.
Reducing noise pollution at home is important for both our comfort and our health. Not only is noise aggravating, but it can increase stress levels, which can lead to decreased productivity and a whole host of physical and mental health issues.
The actionable items in this article will give you the tools you need to quiet AC condensers and other HVAC equipment, providing you with the peace and quiet you deserve.
Understanding Noise Sources in AC and HVAC Systems
There are a number of factors that could be contributing to your unwanted AC and HVAC noise. Older systems are more prone to producing noise, but even newer systems may produce noise if they are experiencing certain issues. Here are some of the most common causes of noise.
Aging Systems
HVAC systems are not built to last a lifetime. Each component may run effectively over a different lifespan, depending on factors such as the type of unit, quality of HVAC installation, usage, and how regularly it was maintained. Typically, you can expect to get 15-20 years out of your furnace, 10-15 years out of your air conditioner, and 10-15 years out of a heat pump. Any noisy component that falls into its corresponding lifespan range may be noisy due to age, and you should think about replacing it in the near future.
Loose Parts
As mechanical parts move, they can become loose over time. When parts become loose, the normal operation of the unit may create vibrations that contribute a substantial amount of noise, depending on what part is loose. These problems can be solved through the help of a professional or someone with considerable expertise. If you don’t know what you’re doing, it’s best to avoid working on HVAC components yourself.
Dirty Units
Dust and debris inside units can also create noise. Foreign objects may vibrate, block ports, or otherwise gunk up the moving parts in the unit. Regular care and maintenance can prevent units from becoming dirty over time, but units will likely need to be cleaned if the material has already made it inside.
Each of these situations can be remedied through proper maintenance, repairs, or replacement, but these solutions aren’t always necessary. We can quiet our units with acoustical and soundproofing products intended to reduce our noise exposure at a fraction of the cost we would incur by hiring professionals.
How to Quiet a Noisy AC Unit
A noisy AC unit can put a damper on an otherwise perfect evening outside, especially if it is located within earshot of the most often used areas in your outdoor space. Let’s take a look at some noisy air conditioner solutions you can take care of yourself.
Choose the Right Location
The first step in compressor noise control is choosing a location for the unit and that is far from the outdoor areas you frequent. A unit that is located on a seldom used side of the house is far less disruptive than one located next to the patio where you gather with friends and family on beautiful summer nights. If the AC condenser is already situated in an unfavorable location, it will be costly to move it, so this step is best taken when designing your home.
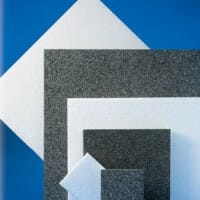
Acoustic Barriers
You can also block the sound from traveling outside the immediate vicinity of your outdoor condenser with acoustic barriers. There are a number of exterior acoustic barriers for AC units that can be used to fence off specific outdoor areas with sound absorbing materials, soaking up noise from your AC unit before it reaches your ears. Be sure to leave about 3 feet around compressor pads to allow for adequate airflow. The most common lining for the air conditioning enclosure is the Sound Silencer acoustic panels.
![]()
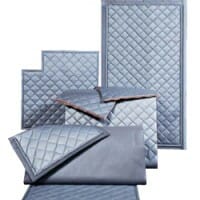
Install Soundproof Blankets for Compressors
Similarly, you can use a soundproof blanket for AC compressors and absorb any noise. They are more custom-fitting solutions than acoustic barriers, and are an excellent way to soundproof AC units. You can find blankets that are designed specifically for your AC unit or you can use soundproof blankets for outdoor use to create a solution of your own. Our best product is the BBC-EXT-TR2 Exterior Grade Sound Blanket.
AC Noise FAQs
Why is my AC making a loud jet engine noise?
An AC unit that is making a loud jet engine noise is often experiencing a malfunctioning fan or motor. There is also a chance that high airflow resistance can create a similar noise, so the first step in diagnosing the issue is to check your filters and fan alignment. If you cannot locate the source of the sound, it may be helpful to enlist the help of a professional.
What are the signs of a bad AC compressor?
There are a number of indications that your AC compressor may not be running at full efficiency anymore, and may be due for a replacement soon. First, if you notice a decrease in efficiency. Such as poor airflow, no cool air, or an increase in your energy bills, the compressor may be on the fritz. Also, if you notice any electrical issues like a unit that won’t turn on, a tripped circuit breaker, or if it begins rapidly cycling on and off, you will probably want to have the AC compressor inspected. Finally, if you notice any new smells or noises, it’s a great indication that your compressor may be going out.
Why is my indoor AC unit making a humming noise?
Humming noises coming from an air compressor’s indoor unit may indicate an issue with the fan motor or capacitor. Sometimes it is something as simple as a clogged air filter, which forces the system to work harder and become noisier.

Reducing Noise in HVAC Systems
If you are experiencing HVAC noise and want to do something to quiet the system, there are some simple things you can do yourself. If you need a more substantial solution than sealants and insulation can provide, you can reduce noise through HVAC system upgrades that offer a host of benefits.
1. Seal Air Leaks
An HVAC system that leaks air will create noise, and that noise is often amplified through ducts and vents. Aside from obvious holes or cracks in your ductwork, there are some common areas where leaks may occur. They include duct joints and connections, ductwork seams, around the vents and registers, and transitions where the ducts connect to the HVAC unit.
There are a number of methods for sealing air leaks in ducts yourself, including through the use of duct sealant, aluminum foil tape, foam sealant and insulation.
In a worst case scenario, replacement or repair of the affected ductwork may be required.
In most cases, when sealing leaks, you will want to turn the system off, clean the area around the leak, apply whichever sealant product you are using, and test the system once finished. Monitor the repair to check for leaks in the weeks and months following the repair to ensure no further action is needed.
2. Add Insulation
Another way to reduce HVAC noise is to apply an insulating layer like Quiet-Duct Wrap™ or acoustic foam for HVAC systems. Duct noise silencer products like this are great at reducing noise and preventing heat loss around the ductwork.
They also offer protection from air currents, moisture, and vapors, which delivers impressive benefits from preventing corrosion to enhancing energy efficiency and extending the lifespan of the ductwork. These products are easy to handle and install yourself, making duct insulation an attractive project for DIY enthusiasts.
3. Upgrade to Flexible Ducts
Upgrading from rigid metal ducts to flexible ducts is another great way to reduce HVAC noise. They are most often made of a flexible inner layer that is surrounded by an insulating outer layer.
This upgrade can help reduce noise by damping vibrations, reducing airflow noise, minimizing impact noise, improving sealing and flexibility during flexible duct installation, and providing enhanced absorption of external sounds.
HVAC Noise FAQs
Why does my HVAC system make a whistling noise?
Whistling noises from HVAC systems most often result from air leaks or improperly sized ducts. The first step in quieting these noisy systems is to check for gaps or cracks in the ductwork or in the seals around vents.
If there are no gaps, you may want to consult with an HVAC professional to make sure your ducts are properly sized for your HVAC system.
Why does my HVAC make a loud noise when starting or stopping?
There are a number of reasons why an HVAC system might make loud noises when starting or stopping. Possible causes range from loose belts to issues with the blower motor or a malfunctioning damper.
If you notice loud noises when the system starts or stops, it is best to consult with a technician to help you identify the next steps.
What causes noise when the heat is on?
Heat can cause harmless noise through the expansion of warming ducts, but noises may also indicate a dirty burner or issues with the blower fan. If you hear popping, clicking, or banging noises during your noise assessment that are consistent with expanding or contracting metal, the noise is likely harmless.
However, if you hear noises related to airflow or sounds like rattling, grinding, or crackling, it is best to consult with a professional for advice.
Conclusion
HVAC systems can create a lot of noise through normal operation, and many of them are perfectly normal. If your HVAC or air conditioning noise problems sound particularly troublesome, it’s important to consult with a qualified technician to get the longest life out of these systems. In cases where the noise is simply the result of age or metal expansion and contraction, you can utilize acoustical products to reduce HVAC noise.
Acoustical Surfaces carries a wide range of products designed to quiet a noisy HVAC system, and our acoustical professionals can help you identify the proper products for your project and give you advice on proper installation. If you’re looking for more information, reach out to our team of experts for guidance on silencing your air conditioner so you can enjoy the cool air from your air conditioner (noise free) as we approach the hustle and bustle of spring and summer.


58 Comments
cfcitywide
I seriously enjoyed this article. This is not some spam BS. I own a heating and cooling company in Chicago and we have been getting a lot of inquiries about sound from ac condensing units and what to do about it. After being in the business for over 40 years it didn’t really occur to me to build a absorber wall for the unit. We have used compressor blankets that the mfg’s provide and the results are poor at best. I was out at the Goodman mfg plant in Houston Texas where I was able to take a tour which included their sound testing lab. It was impressive and used some very sensitive equipment to measure db’s and frequencies. It seems that after seeing that I realized a bit more about the way the vibrations travel and the blankets can only do so much. I will without a doubt offer this as a possible solution to this menacing problem. thanks for the tip. I would like to know if I may use this info on my website?
Mitchell Moore
Citywide Supply & Service
Chicago AC Repair
Ted W
Eric,
Quieting air flow is a much different approach than a noisy machine. To eliminate the air flow noise, either a soft duct lining needs to be installed into the duct or a duct silencer needs to be installed in-line with the duct system (like a large car muffler). Both are VERY difficult to try to get into a retro-fit situation. Is this a residential situation you are considering?
eric wolff
What about interior “whooshing” sounds coming from the interior vents and dealing with people with hypersensitive hearing and consider the loud rush of air coming out of the vents an annoyance?
any ideas on how to difuse the noise?
Kay
What about units that are on the roof? This is a condo building and the folks under me have their unit on the roof and I get to hear it thumping on and off
all night.
They claim it’s been checked and working properly…maybe so but the noise
is unpleasant.
Would this type of sound proofing work for roof AC units?
We live in CA.
Julie
I have the same issue of living in a condo with 4 AC condensers situated on the roof right outside my rooftop deck. The units vibrate the structure they sit on (which is the top roof of a covered walkway between condos) that is attached to my condo. The noise is crazy. The situation is under review by the HOA lawyers but until I get some word back from them, I’ve decided to move ahead on my own to resolve this issue. This blog is a start. Any ideas, anyone? Please, I’m desperate! Thank you!!
Ted W
Hi Julie,
I’m sorry to hear about your problem. There are a few things that could likely be going on here. Your mention of the units vibrating the entire structure is the most troublesome and should probably be addressed first. If you still have an airborne sound problem after that, you can take that as a next step.
I would strongly recommend a series of spring isolators that will raise the machines off of the roof and allow them to shake and vibrate independent of the structure. The springs in this instance would work a lot like a car’s suspension — eating up a significant amount of vibration energy. There are a LOT of different options and models of spring isolators, so I would need to get more information from you about the machines, corner weight, where you are located, etc. You may be able to get away with housed spring mounts, or you may need a seismic or wind-load-rated mount which would be more of a custom order.
If the vibration issue is resolved and you need to take the situation further, you will likely need some kind of exterior-rated sound blanket to stop the sound from “pouring” over the edge of the roof and down toward you.
If you want to send me a few photos of the situation as well as your address (so I can get a Google Earth view of the situation), I would be happy to try and help further.
Thanks,
Ted
don mixon
I have noticed that on new units, one next door & one at a friends house, that the compressors are now being wrapped with some type of weather proof insulation much like the ones you can place around a water heater tank.. On both these units the humm is completely gone and you only hear the fan. My question is can you put one of these on a unit that is 5 years old to help quiet it down some. Thanks Forrest Mixon
Tyler
Kay,
Thanks for your question. Ted, our normal blog writer, is out so I am replying in his place.
I don’t believe the Quilted Curtains would help your particular situation. You see to have a vibration problem instead of an airborne noise problem. I would recommend isolating the unit from the roof so that it is not in direct contact with it. This will make it so that the vibrations the unit is creating cannot travel into your living space.
To help reduce the vibrations, we do offer many different options, depending on the details of your specific situation. Feel free to give me a call and I would be happy to talk with you about your options.
Tyler
[email protected]
Tyler
Forrest,
Thanks for your question.
Unfortunately, I cannot answer that question. That really is a question for the manufacturer of the AC Unit. The specifications of the AC Unit determine the treatment that you can put on or around them. Again, this is not my industry, but the manufacturer will be able to recommend what you can do.
If you have any other questions, let me know.
Tyler
[email protected]
icehead
Tyler,
What if the noise problem isn’t on the outside of the house, but on the inside? Our furnace/air conditioner combo makes a lot of noise when it blows; is there anything we can do to minimize it?
Dawna King
Hi.. I live in an apartment on the top (fourth) floor and the condensers are above my unit. There are four floors and four condensers above my bedroom supporting each apartment. I am on the fourth floor. The noise impedes my ability to sleep. So I have been trying to discuss ways to muffle the sound with the maintenance crew. Any suggestions would be greatly appreciated. Thanks…
Ted W
icehead,
There are a few things that you may be able to do to quiet down the system. I would probably suggest first calling an HVAC contractor to check out the system to make sure it is functioning properly. If it is, there are really only two other approaches. The first is to have a custom made in-line duct silencer fabricated and installed. These are basically like a big car-muffler for the system. It forces air past a duct lined and baffled with an acoustical absorber. Each unit is custom made based on the height, width, length and CFM (measure of airflow) associated with the duct. The other option is to line the inside of the duct with something like the Quiet Liner (//www.acousticalsurfaces.com/quiet_liner/quiet_liner.htm?d=26) which is a recycled cotton roll that glues to the walls of the duct.
Please let me know what additional questions you have.
Thank you!
-Ted
Ted W
Dawna,
Sorry to hear that you’re having problems with your living situation. Just about EVERY time a similar problem is expressed to me, the only way to start to reduce the sound that is bothering you is to put each compressor (or the lot) on some kind of spring isolator which can significantly limit the amount of vibration energy that is currently getting into the structure. Typically these machines are not overly loud but because of the nature of the machine, they can introduce a massive amount of vibration energy that will transmit itself down, through the roof, joists and physically move/shake your apartment.
There are quite a few different models and types of spring isolators but in most cases, one of the Type C Spring mounts are used: //www.acousticalsurfaces.com/mounts_springs/spring_isolators_c_cip_ciw.htm?d=24 so that the machines do not fall off of the isolators.
Please let me know what additional questions you have!
-Ted
Sari
Ted…can you offer some thoughts on hanging the acoustifence on the enclosure surrounding ac units. The 6 ft x 30 ft size is perfect for my dimensions. Thank you for your info!
AlliedAps
Great post ! Building an enclosure works, and it’s pretty cheap. A simple frame made of 2×4 boards covered with 2’x4′ acoustic ceiling tiles (made for hanging grid ceilings) is a good start – put the “pretty” side of each panel toward the compressor – and don’t forget the floor and top of the box. Two layers would be twice as good (be sure to stagger the joints to keep sound inside).
Lindsay Prich
Read your article, I learn a lot. thank you for sharing.
Franco Rosso
Ted, I enjoyed reading your article. I replaced my entire home AC system and added a zone about 12 years ago, and they are damn noisy. The biggest problem is the vibration of the metal grills that cover the top of the units and hold the fans. The touch the metal sides of the condenser units and REALLY add to the noise. If I place my hands on the grill and push down the vibration stops and all you hear is the fan, which isn’t too bad. So…..I want to place some type of vibration reducing washers on the screws that hold the grills, or a gasket where the grills touch the condenser, but not sure if there is good material that someone has used before that won’t wear out quickly. BUT, there might be an even better solution that I haven’t heard of. I had a tech out here but he just said to stuff some rubber under the grills and that doesn’t work. Any ideas?
Ted
Franco,
Good morning and thank you for the post. Have you looked into the HG Washer bushings? They may work:
//www.acousticalsurfaces.com/mounts_springs/neoprene_isolators_hg.htm?d=24
-Ted
Neal Andrews
Ted, we recently moved into an apartment with an electric, water based heating and cooling unit (i.e. heat pump). It’s located in a closet in our living area, and while it works very well, it is very noisy. The closet has a luver door, which I assume is necessary for ventilation. I’d love to line the inside of the door to block the noise, but several people have advised me against it. What can you recommend to deal with the noise problem? Do you know of anyone in the Philadelphia area I could ask to take a look at my situation? Thanks for your help.
Ted
Neal,
I would assume that the louvered door is necessary to keep the machine from overheating as most louvered doors are installed for this reason. From an acoustical standpoint, there is not a door separating you from the noise source. I would strongly consult a local HVAC service tech to advise you what you can and cannot do.
You may get some reduction by installing an absorptive surface on the side and rear walls of the closet as often times what happens in situations like this is that ALL of the noise being generated by the machine reflects off of the walls and comes out of the door. This scenario is much like a band-shell where all of the sound pressure only has one direction to go. Many people use the 1” or 2” Echo Eliminator (//www.acousticalsurfaces.com/echo-eliminator?d=0) on the walls of the closet to reduce this. These panels are very cost effective and do a really good job at absorbing sound.
Thank you,
-Ted
Neal Andrews
Thanks Ted; that’s what I thought you would suggest. I’ll give it a try.
Keep your fingers crossed for me!
Neal
Katie
I live in a 2nd-floor back unit in a big apartment building in NYC. On the back of the adjacent building, about 15 yards away, there are two machines — one old and one newly-installed — that are keeping me up at night. The old one goes on and off all the time, including the winter, and when it starts up, it makes kind of a “boing” sound & runs maybe 10 minutes at a time. I can’t see this machine to be able to describe it. What type of machine do you think this is? I can live with it, but it’s annoying. The second, newly-installed machine I’m having trouble tolerating. It has been running from 3:30am to 7am every morning, is a large vented thing and connects to a tube that runs around their building where I can’t see it. What kind of machine do you think this is? Do you have suggestions I can convey to our superintendent who can then convey them to the neighboring building? The machines and my apt unit are basically on the bottom of a narrow cement and brick canyon. Both buildings are 15 stories.
Ted W
Hi Katie,
Thanks for the question. Unfortunately, you will probably not like my answer.
We can build custom noise barriers around these type of machines. I am not aware of what that specific machine is from your description. The problem with this solution that they are custom made and very expensive.
I would suggest going to your city or superintendent and see if they will conduct a noise study and hopefully have them pay for the solution if it is bad enough.
Thanks,
Ted
colin
Hi Ted/ Tyler
This is just the kind of info I have been looking for. I live in England where this is generally not such a problem, so not much info from UK sites. However, I recently had installed a Hitachi system which will be an aircon system in summer (assuming we get any warm weather then) but is also a heat pump working to heat the house in winter. And it is very efficient, produces a lot of heat for little power input and is very quiet inside our rooms. BUT, the outdoor unit can be really noisy when it is producing max output and the outside temp is down to freezing. It sounds like a small airplane! We can hardly hear it, but our neighbors are finding it a nuisance at night. I am also concerned about what it will sound like in summer if we get a hot spell and people have windows open. The unit is on our wall and quite close to their boundary. My neighbor is happy to help me find a solution. The only problem seems to be, is it practicable to import acoustic panels or blanket from the USA? Or is there a UK agent for your product, or anything similar?
Ted W
Thanks for the comment! It’s great to hear that people still find these articles helpful.
I would start by consulting with a local service person – someone who would come out to repair the machine in the event it was not working. Talk to them about your plans to build a wooden fence around the machine. Ask them how much room around the machine it will need to operate and if you will need to make any of the walls of the fence removable so that it can be serviced. Once that is determined, you can either build, or have a local company build a wooden fence around the machine outside. Depending on the type of fence that is built, this may or may not stop enough sound to make your neighbor more comfortable.
If the fence itself is not enough, we will want to proceed with that on a per-job basis. I will likely need you to send me a few digital pictures of the area as well as the measurements (width and height) of the walls of the fence. I have even used Google Earth in the past to get satellite pictures of the buildings so that I have an even better idea of the area, distance, details, etc. In the event that the fence does not help to the degree needed, we would either need to fabricate a set of exterior-rated blankets and send them to you, or potentially help you try to source something locally.
Thanks,
Ted
jennifer
I found this article very helpful. Fiance and I just moved into a BEAUTIFUL, brand new green building in Brooklyn and we have a huge terrace with a view overlooking Manhattan. Summer is coming so I was excited to host some get-togethers out there, only problem is the SUPER noisy ac/heat air compressor or something. I don’t want to build anything too expensive or permanent because it is a rental plus, it is a NYC iniative of Middle Income Housing so any changes to the property would need to presented before a board. My estimate in measurements is 3ft in Length x 2ft in width x 2.5ft in height. Any suggestions? Please email me so we can discuss estimates in the blanket you mentioned? [email removed for privacy]
Ted W
Jennifer,
Very glad to hear you found this helpful. Sorry to hear about the problem you are experiencing on the terrace. You provided some measurements, but you did not explain what it was you were measuring.
If you can SEE the air compressor, you will be able to hear it. Because of this, your noise barrier will need to introduce a line-of-sight-barrier between you and the noise source. You could use exterior-grade plywood to build a cost-effective and free standing wall that might help. The products that we have to offer for outdoor use are usually in the $14-16/sq. ft. range, depending on the product, dimensions, and options.
Thanks,
Ted
Michele Peterson
This is a question more than a comment. I recently began to notice a loud intermittent noise in my back yard. It kind of crept up on me, as it was new in intensity. It turned on and off every ten minutes, lasted a minimum of one minute, and was LOUD. I told my landlord, who said he thought it had to do with irrigation for his new orchard. He said he’d reset it so it didn’t run at the same hours. The problem has not been resolved, so I’m looking for ideas to contain the sound. The cylindrical pump is small, only around 17″ X 6″, but each time the noise starts up it’s like someone has started a truck and revved the engine for a minute or more. Thanks for any ideas.
Ted W
Michele,
You are likely going to need to build some kind of enclosure around the pump — making the walls and ceiling as dense and heavy as possible. If you use concrete block and fill the block with sand as the enclosure is being built, that would be the most effective and cost-effective noise barrier.
We have a few products that can be attached to a wooden or metal-framed structure — the Sound Silencer and the Exterior grade sound blanket — reinforced which I discuss a bit in the article.
Without knowing much about the situation, I would assume that you will need a minimum of a three-sided enclosure with a roof section — leaving the open end of the enclosure toward the orchard — or at least away from your house.
Hopefully this helps — please let me know if you have any more questions or you would like to discuss the situation further. Thanks,
Ted
Roobik
Hi Ted, I live on the top floor of this rental apartment in Burbank, CA. The folks under me have their AC unit on the roof next to bedroom, and the vibrations from the compressor in AC transmits into the roof and into my bedroom and also I hear constantly the thumping on and off of the compressor all night! the noise is crazy and impedes my ability to sleep.
The AC crew have inserted small 4 pieces of rubber pads ( may half an inch thick) under the end corners to lift it from the platform and in addition they have placed a sound plate under the compressor in order to reduce noise and vibration, but these efforts have not yet reduced the vibration nor the noise. AC man also told me that he has placed some capacitors on the wires to reduce the thumping, but that hasn’t help the noise from thumping at all.
I was thinking to tell the property management office to insert 4 pieces of Ribbed Neoprene and Cork ( 6″x 6″x 1″) under the machine or 4 Spring Isolators to lift up the machine off the platform, in order to reduce noise and vibrations, but I don’t think these will have any effects on reducing the THUMPING on and off !
I would appreciate in advance your recommendations that I can transmit those to the manager.
I has been a night me for me all this summer and if it’s nothing can be done I’m planning to move out!
Thank you, and I will wait for your response,
Roobik
Ted W
Unfortunately, working from behind a computer and not being there to experience the problem has its limits. I am not going to be able to solve or even offer suggestions or recommendations fro ALL the problems and this is one of them. I’m sorry, but you are likely going to need to have someone there to see and hear the problem.
Best of luck,
Ted
Kym
Ted, you have some wonderful insights that are a great help to us folks who are trying to deal with these annoying situations. My situation is as follows and I would really appreciate you thoughts on how to remedy it. My wife and I live on the second floor of a condo building (contains only units). The owners of the unit below us have installed an AC handler (fan) in their ceiling (our floor). The condensor for the AC handler is located outside at ground level and I don’t think is playing much of a role in our problem. Whenever the AC handler in our floor is on our floor vibrates very noticeably and this vibration carries through our furniture. The construction of the floor is typical timber framing but with a thin layer (1 1/2″) of concrete forming the subfloor. The floor joists run widthwise, as expected, of what is essentially a rectangular floorplan. The owners of the unit below have had their AC tech out and he said that the fan and unit look fine and simply placed a few rubber pads on the corners (I assume) which really sisn’t improve things much. So it is now up to us to offer some type of remedy. I have been looking at spring-based hanger mounts and they seem to offer the most promise. Would you agree this and/or would you recommend any other strategies? One thing that is strange is that while the vibration is certainly strongest within a 10’x10′ area in the floor, the vibration actually carries across the joist bays and can be felt 25′ or so away on the floor. I also want to mention that we will be replacing our current carpet with wood flooring (or engineered flooring) in the near future and wonder how effective a dampening underlayment would actually be in this situation? … Looking forward to your insights on the whole situation… Thanks
Ted W
Thanks for the complete description of the situation and problem! You are exactly right with spring hangers being the first step. These will allow the machine to shake and vibrate as it needs to without the energy carrying to the structure above. Without question, this would be the first step I would take if this were my issue. I would then take a step back and listen. Unless something else is carrying the vibration energy to the joists, I would feel pretty comfortable saying that this should eliminate the problem. Depending on the frequency that it is producing coupled with the structure, it’s not all that surprising that you can feel/hear the vibration 25′ away in the 10 × 10 room — there are a lot of very complex physics involved.
Regarding the carpet and flooring — the Acoustik underlayment is probably your best bet there. This is an underlayment made from recycled rubber particles and is generally used to reduce the sound/noise from your footfall and similar impact noise(s) from getting downstairs. It would only be minimally effective at reducing the A/C fan problem that you discussed, since that is structure-borne vibration energy.
Please feel free to let me know if you have any more questions. Thanks,
Ted
Eleanor
Hi Ted!
I was wondering whether you could offer me some practical advise. My situation is as follows:
We live on the ground floor of a 2 story detached house. Our bedroom window is facing our (noisy) neighbours’ front door,living area and patio of their detached house – so we can hear everything from our bedroom. We tried to solve the problem by installing double-glazed windows, that were supposed to eliminate 80% of external noise (we wish!).Since we didn’t get satisfactory results, a friend suggested fitting a thick sheet of window-sized foam between the closed window and the external window shutter, which we could remove and fit whenever necessary. This muffles voices,which is good enough for us, but we can still hear the awful high pitch sounds of their TV. Is there anything you could suggest, preferably on a DIY level, that could solve the problem? I would really appreciate your expert advice. Many thanks indeed.
Eleanor
Ted W
I apologize for the delay, it has been amazingly busy around here lately.
I’m having a hard time understanding the situation holistically. Are you currently being bothered in your bedroom from the noises that are being made within your neighbor’s house? How far away is your window from their front door? And, you can hear the TV that is inside their house? The details here just aren’t jiving with the picture that I have in my mind’s eye, which may or may not be even close to what is going on. But, if they are listening to their TV in their house (with the windows closed) and you are in your bedroom (also with the windows closed), and you are still hearing a high-frequency that is being generated 20-30 feet away and traveling through TWO closed windows — it must be extremely quiet in your bedroom or you have amazingly sensitive hearing. Again, I’m making some assumptions here, so correct me if I’m wrong.
When the new window was installed, it’s likely that they shimmed the window into the rough opening and maybe put some insulation in the gap between the rough opening and the window jamb. I would pull the trim away, compress the insulation by pusing it into the gap, and finishing that joint with a non-hardening acoustical sealant or non-hardening construction sealant. I would also make sure the window was as airtight as possible.
Sound travels first through any common air gaps and cracks — so be sure that your window assembly is as airtight as possible. The next path of least resistance is the area of the wall with the least amount of mass and density. You could potentially make a window cover out of sheetrock or 3/4″ MDF board. You could use some adhesive-backed weather stripping to make the window cover as airtight as possible. You can shine a light as a way to test for leaks coming through anywhere.
Hope this helps. Thanks,
Ted
Eleanor
Thank you very much indeed for your reply.
Yes,it is quite difficult to understand this particular situation,I totally agree, but I think you’ve hit the nail right on the head by suggesting a window cover made of sheetrock or MDF board. I’ll certainly give it a try anyway!
Thanks again Ted,I really appreciate your help.
Eleanor
Anthony
Hi Ted, I have a noise problem from my neighbors rooftop heat pump and want to see what your opinions are. I own a town house that has a shared roof with my neighbor and his heat pump is on top of his unit and mine is above my unit. Although his heat pump is not above my unit, I can hear the low frequency noise when it is on and especially when it kicks in and the noise is the loudest right at my bed. Heat pump is already on isolation pad and I am pretty sure the noise is structural borne since i can hear the vibration if i put my ear in the wall. I have read your comment on isolation springs but AC technician suggests I try sound blanket on the compressor inside the heat pump because he thinks there is no vibration and the blanket would help reduce a lot of the noise. Also he says installing springs would be expensive, around 2 grand because of all the labor involved. Do you think sound blanket would help? Or are springs the ultimate solution? Thanks a lot.
Ted W
Considering your mention about being able to hear/fell a vibration when you put your ear to the wall, I don’t think that a compressor wrap/blanket is going to offer much, if any, reduction to the sound problem that you are experiencing in your bedroom. There is no doubt that lifting the equipment can get expensive, but it is almost always — and usually the only — way to start to reduce the problem. Another thing to consider is that if the machine is vibrating and there are pipes connected to the machine — the pipes can also introduce a vibration into the structure. It’s usually not as severe as the machine itself, but it can be an issue in some cases. You could absolutely TRY the blanket/wrap first and see what that does, and although it is true that every situation is different, I would guess that the best way to reduce/fix this problem is a set of spring isolators.
Thanks,
Ted
Joshua Berry
Great article. Between that and your response to comments I am a believer :-). I have a compressor unit right outside my bedroom window, about a foot from the exterior wall. The fan noise as well as the noise that occurs when the unit kicks on or off is particularly loud even with my window closed. I am hesitant to build too much if a barrier between my window and the unit because I don’t want to kill my view. Any recommendations?
Ted W
It’s always best to try to stop the sound as close to the source as possible, but in this case it would likely inhibit the view from your window. I’m a bit hesitant to try to make this recommendation because there is a decent chance that the sound is coming through the wall of the house as well, but you could potentially start with one of our Climate Seal acoustical window inserts.
It’s very common that the weakest link in a wall is the windows and it’s usually a logical place to start with for acoustical treatments/improvements. But because most AC systems produce a relatively loud and quite low set of frequencies, it may or may not offer a substantial enough reduction for your situation. One cheap and easy “test” approach would be to cover the window with a piece of 5/8″ sheetrock and use a standard sticky-back weatherstripping to make the sheetrock air-tight to the window. Leave that in place for a day or two and if it gives you enough reduction, the Climate Seal will block a bit more and be perfectly see-through and easily removable.
If you’d like a quote or need more information, please let me know. I would simply need your address, phone number, the measurements for the window, and a digital picture or two.
Thanks,
Ted
Jacqueline Eick
Please answer asap anyone! The ac outside is silent, don’t know whether ac is broke? It feels like fan is only running! I can’t afford to have it fixed, please help!
Ted W
It sounds like you may need to contact a local HVAC person to check it out. Sorry, we are not an A/C repair company and can not help with this situation. Best of luck to you.
Michael Spencer MLA ASLA
Hi Ted: I’d sure like to get advice and a quote on a couple of noise issues.
First is our office- the reverb is awful! Bare tile floors and bare sheetrock (painted) with high ceilings. What would you need, a few photos?
Also have a very noisy A/C unit. Looks like I found the right place!
Michael Spencer
Ted W
If you could send me the dimensions along with a few digital images of the office area with the echo/reverb problem, I would be happy to start that discussion with you. We have quite a few choices for different acoustical panels to help with issues like that and each has its own respective advantages and disadvantages, as well as costs and aesthetics.
The noisy A/C unit is a different game all together. Digital pictures also help with that, and if you could send me a bit of information about the nature of the problem and details about the situation, that will also help.
Thanks,
Ted
Roobik Gorjian
Hi Ted, I hope that you’re doing fine. About 3 months ago you advised me on how to reduce vibration and noise from a noisy AC unit located on the roof next to my bedroom. You suggested to me that I should instal 4 Housed Spring Isolators in order to reduce vibrations from the compressor in the AC unit. I told the property owner about the vibration and noise in which impedes my ability to sleep, and a month later the owner installed 4 Housed Spring Isolators under the AC unit and in addition he added a sound plate under the compressor as well, and amazingly the noise from the compressor was reduced by about 60% , and this happened all because of your advise and I thank you for that.
One more difficulty remains to be resolved and that’s the noise from the Initial Start of the compressor, another words every Initial Start of the compressor has a loud thumping noise and the AC mechanic doesn’t know how to fix this. Ted, do you have any suggestion of how to reduce the noise generated from the Initial Start of the compressor ? Does Thermostat has any bearing or effect on the Initial Start of the compressor?
I thank you in advance for your suggestion.
Sincerely yours,
Roobik Gorjian
Ted W
GREAT to hear that the spring isolators helped to reduce the noise. And, thanks for taking the time to let me know that it helped in your situation!
Do you know if the start up noise is an airborne sound coming through the structure, or an initial vibration? Could you send me a few photos of the situation? That might help me make recommendations.
Thanks,
Ted
Roobik Gorjian
Hi Ted, and thank you for responding to me so quickly. You asked me whether the start up noise ” is an airborne sound coming through the structure, or an initial vibration is an airborne sound coming through the structure, or an initial vibration?”.
The start up noise is an airborne sound ( like a loud click ) coming through the structure into my bedroom and this happens when the thermostat turns on the compressor. The AC unit belongs to my neighbor below me and it’s on the roof over my bedroom.
Ted, I’m not allowed to go to the roof to take pictures of the AC, but the contractor showed me the installed Spring Isolators, as you recommended those a few months ago.
I hope that I’ve given you enough information about the start up noise.
Thank you,
Roobik
Ted W
If it’s an airborne sound, you might benefit from putting something like an acoustical Quilted Curtain between the compressor and the wall.
If you can space the panel off the wall by a little bit (even an inch is fine) that is ideal.
The product is an exterior-rated barrier that will block noise as well as absorb the sound that hits it. They are custom-made to size and UV-stable components are used. Kind of like a backstop for a baseball field, the size of the blanket depends on the size of the compressor and the distance between the compressor and the wall.
Let me know if you have any questions. I would need some idea of the dimensions that you need to put a quote together for you.
Thanks,
Ted
Roobik Gorjian
Thank you Ted for the information on Sound Blankets. If the property owner decided to go ahead with this I’ll let you know.
Thanks again,
Roobik
carol hannah
Hi! the basic drawing is just what I had in mind for my neighbors ‘noise maker”. she said it would be okay, then changed her mind. “everyone” keeps telling her it will block the air flow and raise her electric bill. my front porch is unusable. it’s very close and runs all the time. any ideas? thank you carol
Ted W
I would have her talk with an HVAC contractor or the manufacturer. People put fences and enclosures around the condensers all the time. As long as this is done properly, which I discuss in the blog article, the machine will be just fine. You will need to get an enclosure with a noise barrier around the thing to use your porch.
Thanks,
Ted
Debbie Davis
Ted,
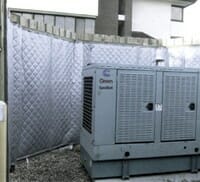
We have two outside units which are elevated about 2 feet off the ground on a wooden platform. (flood area) The noise from the units is very annoying and i was looking to build a soundproof enclosure. I like your picture in the blog; is that PVC piping you are using in order to make the enclosure removable? Since you suggest a panel ‘double the height of the unit’, i would guess that if my units are 2 ft tall, i would need panels of at least 6 feet from ground to top…correct?
Thanks for your help,
Debbie
Ted W
The white lines in the picture above are just me digitally modifying a photograph to show the idea I was talking about. As long as the PVC pipe is thick enough, there is no reason why it wouldn’t make a good frame for an enclosure. The curtains that we sell are UV-stable so you would not necessarily need to remove them, but that is up to you.
Yes, your high assumption was correct. If the noise source is 4′ in the air, I would suggest a minimum wall height of 6′ off of the ground. The idea here is similar to a baseball backstop. The higher the fence, the more foul balls (or noise) it will stop.
Thanks,
Ted
Debbie Davis
Ted,
One more comment…..I just went to the website to check out the pricing for the acoustic panels and it appears they are only sold by the box. Is that correct?
Thanks,
Debbie
Ted W
The Sound Silencer panels are sold online in full box quantities, but I would be happy to type up a quote for as many or as few panels as you would like. I would also be happy to put together a quote for the quilted blanket, which would likely offer you more performance than the Sound Silencer panels.
Thanks,
Ted
Sue Lee
Hi Ted. Help please! My neighbours have just installed a heat pump, along a wall facing our house. It’s just under 2 meters away from our house, facing our kitchen and living room. Our houses are tall and narrow two story colonial houses (in New Zealand), and down the sides their exterior walls are corrugated metal. I find the pump noise very hard to take. A builder suggests an acoustical fence to replace the picket fence between the properties, made of timber 20mm approx thick, 1800cm high (the unit is at ground level), with battens covering the joins. My worry is that the sound will bounce off the wood, on to the metal walls and back again, maybe making the problem worse. Any thoughts would be very welcome! Thanks, Sue
Kyle Berg
Hi Sue,
I think we have all had the noisy neighbor at one time in our lives. The noise may be from different sources sometimes, but I do understand your problem!
The fence idea is a good starting point, but will not benefit your problems itself. The fence would be a great idea for the structure in order to hang material from to stop the noise, though. I have a couple options that would help with this noise, but do keep in mind, these will need to be on your neighbor’s side.
The first option would be to enclose the heat pump with our Echo Barrier panels. Making sure to give it enough room to breathe, mount over a structure that covers the sides and top of the heat pump. These can also be hung from a fence, but would need to be hung on the neighbor’s side of the fence. A big thing to keep in mind, if you haven’t built this fence yet, is that in order to mitigate noise from a source, the material needs to be at least twice as high as the noise source, from direct line of sight.
Another product that would help with the noise, would be installed on the inside of your windows. Our Acoustical Window Inserts are acrylic inserts that will block noise from outside by creating a solid panel on the inside of the window, which creates an air gap between it, and the window. These are installed by mounting a trim around the inside of the window jamb, then the insert is magnetically adhered to this trim, so that they can be inserted and removed when necessary. You would want to install these on each window that faces the noise source.
If you have any other questions, please let me know.
Cheers!
Kyle
ASquared
Another possibility would be to tip panels in towards the A/C. The angle should be as close to 45 degrees as you can manage to aim the waves to the ground. In this manner, the ground becomes the absorbant. Then you could hide that with a decorative fence surrounding it. It works great for your generator as well.