Reverberation Time (RT60): Why It Matters and How to Measure It
When it comes to designing or improving a space, RT60–or reverberation time–is one of the most important acoustical metrics to understand. It affects both the way the room sounds and how comfortable and usable it feels. Many people assume that adding acoustic panels is the solution to every sound issue, but optimizing reverberation time is about balancing absorption and reflection to suit the room’s purpose. Too much absorption can make a space feel “dead” and unnatural, while too little leaves it echoey and noisy. The goal isn’t simply to “soak up” sound–it’s to fine-tune RT60 so speech is clear, music has a warm feel, and the room is set up to function as intended. That’s why RT60 is such an important factor in acoustics in architecture–helping designers and end users alike create spaces that are both functional and inviting.
Reverberation Time Explained
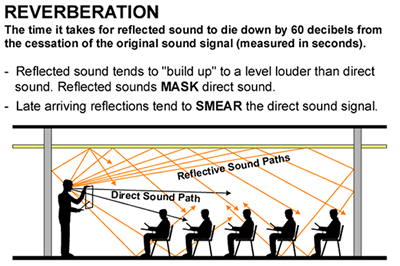
So, what is RT60? Reverberation time, often referred to as RT60, is the amount of time it takes for a sound to decay by 60 decibels in a space. Put simply, it’s how long it takes for a sound to fade from full volume to near silence after the source stops. It’s an acoustical parameter that was initially developed for reverberation in concert halls, but it has applications in a wide range of spaces today, from classrooms and offices to recording studios, churches, and home theaters.
RT60 affects speech intelligibility, musical warmth, and general comfort. A short RT60 can make words crisp and clear, ideal for classrooms or conference rooms, while longer RT60 can enrich music in recording studios or performance spaces. Managing the balance between reverberation vs echo ensures spaces feel lively without becoming fatiguing.
What Influences Reverberation Time
 A room’s reverberation time is shaped by several key factors that affect how sound behaves. Room geometry–high ceilings, large footprints, or domed spaces–can prolong RT60, while smaller, compact rooms shorten it.
Surface materials also play a major role. Hard surfaces like concrete, glass, and drywall reflect sound, extending reverberation, whereas soft materials like carpet, fabric, or acoustic panels absorb it. Each material’s absorption coefficient helps predict how it impacts sound decay in a room.
Occupancy affects RT60 as well. A full room absorbs more sound than an empty one, which is why testing should reflect typical use. Understanding these variables is essential before applying room treatment strategies to achieve the right balance of clarity, warmth, and comfort.
Measuring RT60 in Your Space
The right treatment plan begins with knowing how to measure RT60. Conducting a sound control measurement by measuring RT60–whether through sound decay in a room or calculated using absorption coefficient values–lets you make informed decisions about room treatment strategies–from acoustic panels to overhead clouds–to achieve the right balance of clarity and resonance. Here are some effective ways to measure the current RT60 in your space.
Using Room Analysis Software
Room analysis software for RT60 calculation is a simple but effective step. Products like REW (Room EQ Wizard), EASE, and other acoustic simulation tools can model sound decay in a room, account for surface absorption coefficients, and simulate room acoustics and reverberation. These programs help you identify problem areas, test room treatment strategies virtually, and make data-driven decisions before installing panels, clouds, or other acoustic treatments.
Decibel Meter + Clap Test (DIY)
For a quick, hands-on RT60 check in small rooms, a decibel meter and simple clap test work well. Clap once sharply and use the meter or a stopwatch to time how long it takes for the sound to fade. Compare the result to typical RT60 values for your room type. This easy method helps you identify overly reverberant spaces before investing in more detailed measurements or treatments.
Read More: Decibel Level Chart (dB Scale)
Calculate Reverb and Delay Times by BPM
In music production, aligning reverb and delay times with a track’s tempo helps the sound feel natural. By calculating decay times based on BPM, you can match effects to the room’s RT60, ensuring echoes and reverberation complement the rhythm instead of clashing with it. This approach is especially useful in recording studios, live venues, and home production setups, creating mixes that feel cohesive and polished while respecting the space’s natural acoustics.
Here’s a quick reference for common reverb sizes and room types, showing pre-delay, decay time, and total reverb time:
| Reverb Size | Pre-Delay | Decay Time | Total Reverb Time |
| Hall (2 Bars) | 62.5 ms | 3937.5 ms | 4000 ms |
| Large Room (1 Bar) | 31.25 ms | 1968.75 ms | 2000 ms |
| Small Room (½ Note) | 15.63 ms | 984.38 ms | 1000 ms |
| Tight Ambience (¼) | 3.91 ms | 496.09 ms | 500 ms |
Delay Times by Note Value (Based on BPM)
When setting up reverb or delay effects, aligning timing with the song’s BPM ensures the decay complements the music naturally. Here’s a quick reference for common note values, including dotted notes and triplets:
| Reverb Size | Pre-Delay | Decay Time | Total Reverb Time |
| Note Value | Notes | Dotted | Triplets |
| 1/1 (Whole) | 2000 ms / 0.5 Hz | 3000 ms / 0.33 Hz | 1333.33 ms / 0.75 Hz |
| 1/2 (Half) | 1000 ms / 1 Hz | 1500 ms / 0.67 Hz | 666.67 ms / 1.5 Hz |
| 1/4 (Quarter) | 500 ms / 2 Hz | 750 ms / 1.33 Hz | 333.33 ms / 3 Hz |
| 1/8 (Eighth) | 250 ms / 4 Hz | 375 ms / 2.67 Hz | 166.67 ms / 6 Hz |
| 1/16 (Sixteenth) | 125 ms / 8 Hz | 187.5 ms / 5.33 Hz | 83.33 ms / 12 Hz |
Tip: To calculate delay for your own BPM, divide 60,000 by your tempo in beats per minute. For example, 60,000 / 120 BPM = 500 ms per quarter note. This method helps match reverb decay and delay timing to the natural RT60 of your space or track.
Try It Yourself – Delay & Reverb Time App
For another hands-on testing approach, the Delay & Reverb Calculator app simplifies timing calculations for any tempo or room size.
Available on Google Play and Apple Store, it lets you quickly determine pre-delay, decay time, and total reverb for different note values and BPMs.
Whether you’re producing in a home studio, setting up live sound, or experimenting with room acoustics and reverberation, this tool makes it easy to align effects with both music and space.
Strategies to Control RT60 (How to Reduce Reverb in a Room)
There are some practical ways to manage reverberation time based on your unique space and acoustical goals. Namely, a proper balance of absorbent and reflective surfaces, strategic placement of acoustic panels, ceiling treatments, and furnishings can help achieve the desired RT60, improving speech intelligibility, room clarity, and overall sound quality.
Add Absorption
One of the most effective ways to manage room acoustics and reverberation is by adding absorption. Acoustic panels on walls or ceilings, baffles, banners, and clouds in larger spaces, and soft materials like rugs, drapes, or upholstered furniture can all reduce excessive RT60. These treatments directly influence the acoustic panel RT60 impact, helping control sound decay in a room and improve speech intelligibility without creating an overly dead space.
Use Diffusion Wisely
While absorption is important, too much can make a room feel lifeless. Strategic diffusion preserves clarity and natural tone, scattering sound waves rather than absorbing them. This is especially valuable in recording studios, concert halls, or churches, where reverberation time and clarity must coexist. Effective diffusion can also aid church sound optimization and room echo reduction in larger, reverberant spaces.
Balance is Key
Managing RT60 is all about balance–between a “live” room with rich reflections and a “dead” room with too much absorption. A thoughtful combination of absorption and diffusion ensures optimal speech intelligibility, musical warmth, and overall comfort. For more guidance on finding the right mix, see our blog on Balancing Absorption and Diffusion and explore room treatment strategies that enhance both clarity and resonance.
Real-World Examples of RT60 Optimization
Exploring some real-world examples of RT60 optimization is a helpful exercise because it shows how reverberation time and clarity can be tailored to different spaces. The examples below demonstrate how some recent projects benefited from RT60 optimization.
Classroom Acoustics: Installing ceiling baffles and wall panels reduced RT60 from 1.2 seconds to 0.5 seconds, dramatically improving speech intelligibility.
Podcast Studio: Carefully positioned acoustic panels and soft furnishings brought RT60 to under 0.3 seconds, achieving the best RT60 for recording and creating a tight, controlled sound for recording.
Church Sanctuary: A strategic mix of diffusers, acoustic clouds (leveraging the acoustic cloud RT60 effect), and absorbers reduced muddiness without deadening the space.

RT60 as a Design Tool
Architects, designers, and AV professionals rely on RT60 as a key metric when planning a space because it quantifies how sound behaves before any treatment is applied. By knowing the room’s reverberation time, you can determine not only the quantity and type of acoustic treatment needed but also how to align it with the room’s function.
For example, classrooms or conference rooms prioritize speech intelligibility, requiring a shorter RT60. Knowing the ideal RT60 for a classroom helps determine the right amount of absorption needed to make speech clear without deadening the space. Concert halls or recording studios may aim for a longer reverberation time to preserve musical warmth, so the ideal RT60 for these spaces will differ greatly from that of a classroom, leading to a different treatment plan. Using RT60 as a design tool ensures that acoustic solutions are tailored to actual needs, rather than guessing, delivering both comfort and clarity in every environment.
Get the Right Tools for Controlling RT60
Controlling reverberation time starts with using the right acoustic products. Acoustical Surfaces offers a range of solutions designed to help you fine-tune your space’s RT60 for speech, music, or general sound comfort.
- Fabric-wrapped panels (NRC-rated): Effective for absorption while maintaining a sleek aesthetic.
- Sound Silencer™ PEPP panels: Lightweight, moisture-resistant panels perfect for schools, gyms, or damp environments.
- Echo Eliminator™ panels: Target specific problem areas for room echo reduction.
- Acoustic clouds and baffles: Ideal for larger spaces, ceiling solutions reduce sound decay without deadening the environment.
- Diffusors: Add balance and preserve natural tone in reverberant spaces.
By selecting the right combination of tools, you can implement room treatment strategies that improve sound quality while respecting the space’s design and function.
Don’t Guess–Measure and Optimize
When it comes to managing sound in any space, guesswork won’t cut it. Understanding your room’s RT60 is the first step toward achieving the right balance of clarity, warmth, and comfort. Whether you’re dealing with a classroom, recording studio, or large sanctuary, measuring reverberation time gives you the data needed to design informed room treatment strategies that actually work.
With the right tools–from acoustic panels and clouds to diffusers and Echo Eliminator™ panels–you can tailor solutions to your space’s unique needs. Evaluate your RT60, plan treatments based on function, and optimize your acoustics with Acoustical Surfaces to ensure your environment sounds as good as it looks.